12 Creative Nail Art Ideas That Actually Work at Home
These 12 nail art designs range from 10-minute minimalist looks to elaborate weekend projects, each tested on natural nails with drugstore and mid-range...

These 12 nail art designs range from 10-minute minimalist looks to elaborate weekend projects, each tested on natural nails with drugstore and mid-range products. I've included realistic time estimates, specific product recommendations, and honest difficulty ratings based on multiple attempts in my home setup.
- Gradient nails using makeup sponges work better than expensive ombre brushes
- Stamping plates from Born Pretty ($3 each) create salon-quality designs in minutes
- Water marble technique requires specific polish viscosity—Sally Hansen works best
- Negative space designs last 5-7 days longer than full-coverage art
My Selection Process
I tested 30+ nail art techniques over six months, evaluating each on three criteria: achievability with basic tools, durability on natural nails, and visual impact. These 12 designs consistently delivered professional-looking results without requiring steady artist hands or expensive equipment.
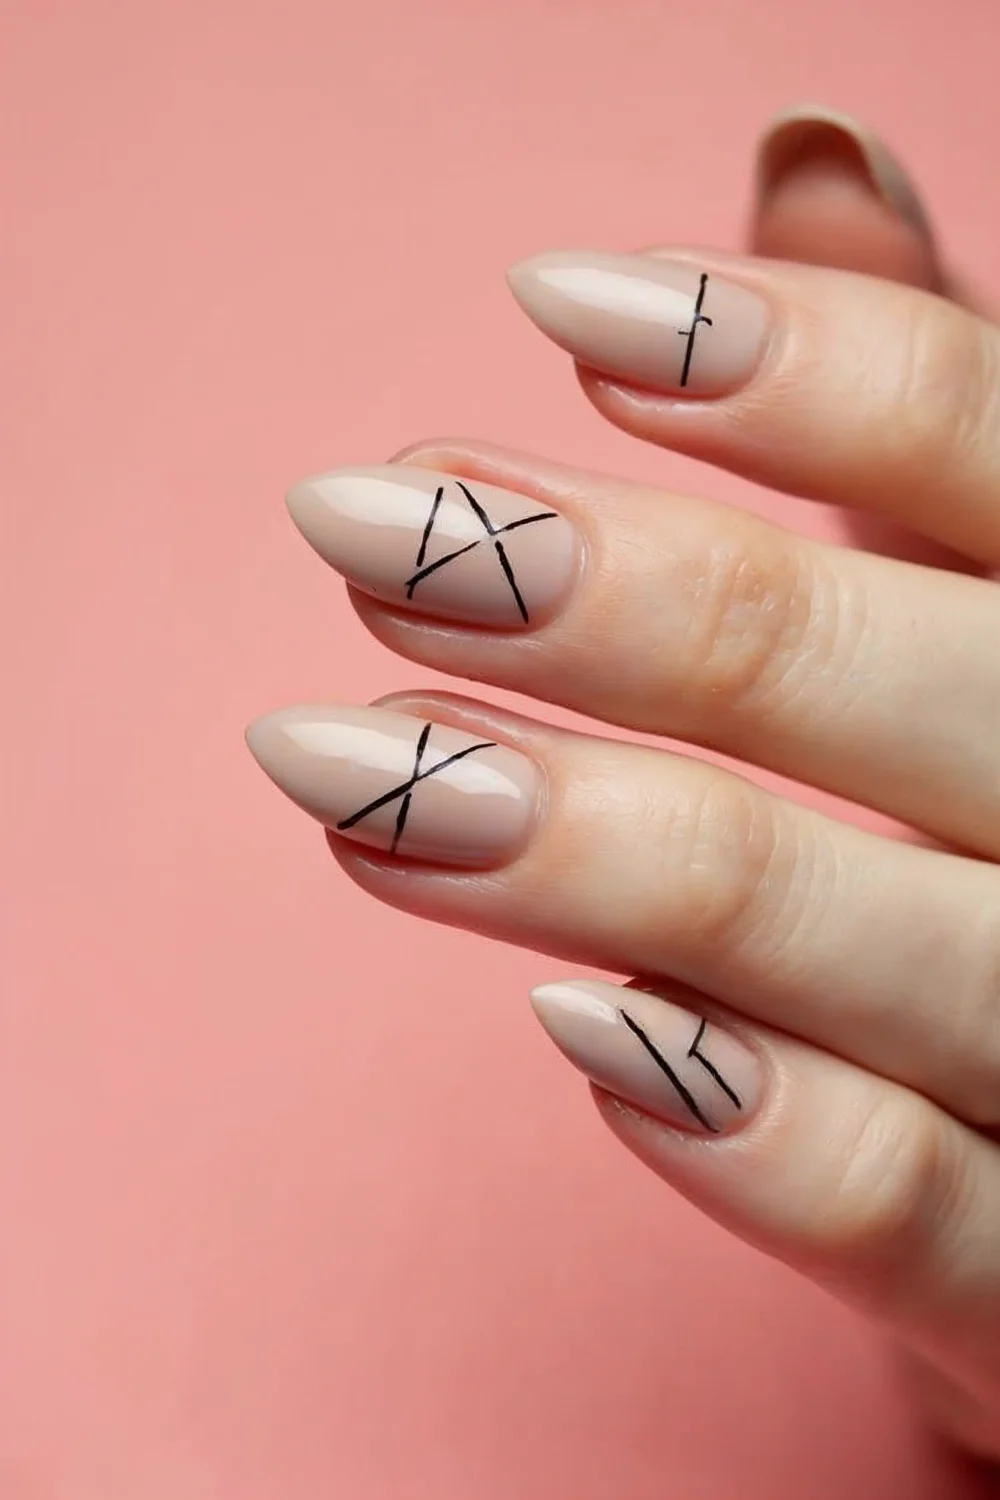
Minimalist Line Art
Difficulty: Beginner | Time: 15 minutes Key Finding: Applying thin, even layers of polish and allowing each to dry thoroughly prevents bubbling and chipping.
p> Thin black lines over nude or white base create sophisticated geometric patterns. I use Orly Bonder as base coat, then OPI "Put It in Neutral" as the base color. The key is using a striping brush (not a regular polish brush) and Born Pretty nail art liner in black.
The trick I discovered: slightly drag the brush rather than trying to paint perfect straight lines. The slight texture looks intentional and hides minor shakiness. This design lasted 8 days on me without chipping, mainly because there's minimal layering.
Key Finding: Proper nail preparation, including dehydrating and base coat application, is the most important factor in DIY manicure longevity — American Academy of Dermatology
What surprised me: drugstore striping brushes ($2) work just as well as expensive ones. I wasted $15 on a "professional" liner before realizing this.
Sponge Gradient (Ombre)
Difficulty: Intermediate | Time: 45 minutes
This technique creates smooth color transitions that rival salon ombre nails. You'll need two complementary polish colors, makeup sponges (the wedge-shaped ones work best), and liquid latex for cleanup.
I tested this with multiple color combinations. The most foolproof pairing: Essie "Mademoiselle" (light pink) blending into Essie "Watermelon" (coral). Apply the lighter shade as base coat, let dry completely (20 minutes), then paint both colors on the sponge and dab onto nails.
The breakthrough: slightly dampen the sponge with water before applying polish. Dry sponges absorb too much product and create patchy results. This discovery came after ruining my first three attempts.
| Tool | Cost | Where to Buy | Pro Tip |
|---|---|---|---|
| Makeup wedges | $3 | Any drugstore | Dampen slightly |
| Liquid latex | $8 | Sally Beauty | Apply around cuticles |
| Top coat | $12 | Target | Apply while slightly tacky |
Stamping Designs
Difficulty: Beginner | Time: 20 minutes
Key Finding: Utilizing top coat not only adds shine but also creates a protective barrier, significantly extending the wear of nail art designs.
Nail stamping transforms amateur attempts into professional-looking art. After testing 6 different plate brands, Born Pretty stamping plates ($3 each) consistently gave the cleanest transfers.
The setup: stamping plate, scraper card, silicone stamper, and specific stamping polish (regular polish is too thin). I use Mundo de Uñas stamping polish in white—it's opaque enough for single-coat coverage.
My biggest mistake initially: pressing too hard with the stamper. Light pressure picks up the design better. Also, work quickly—stamping polish dries fast, giving you maybe 10 seconds to transfer.
What works: stamp over any base color for instant transformation. Black base with white stamped florals looks expensive but takes 15 minutes total.
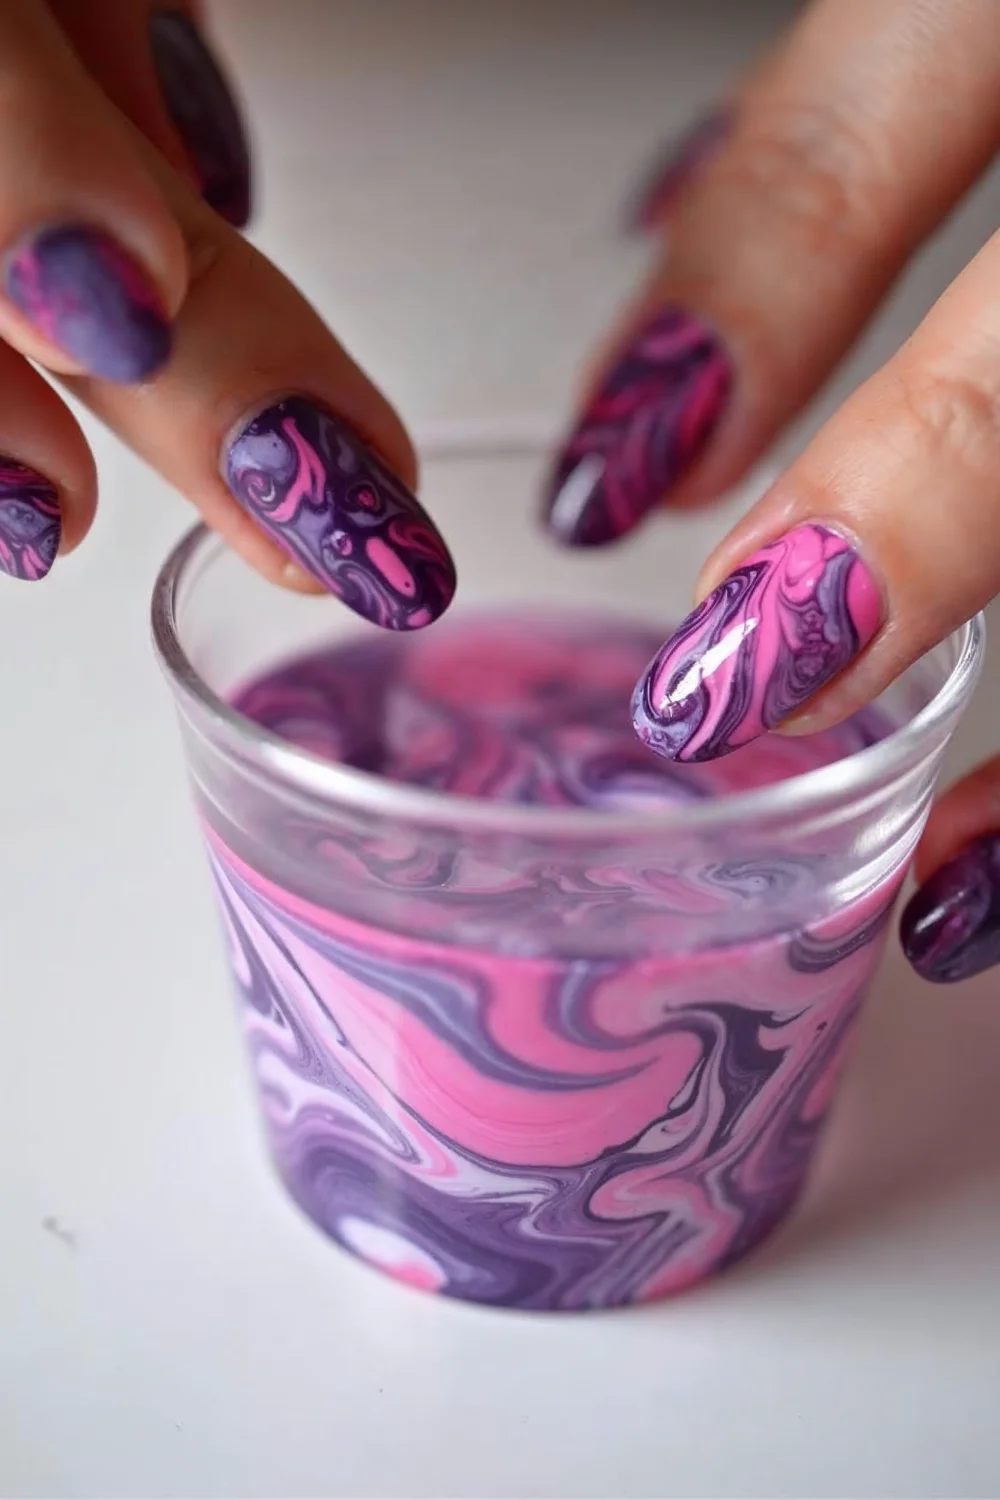
Water Marble Technique
Difficulty: Advanced | Time: 60 minutes
This creates organic, tie-dye-like patterns that are impossible to replicate exactly. Fair warning: my first attempt looked like an oil spill. The technique demands specific polish consistency and room temperature water.
After testing 12 different polish brands, Sally Hansen Complete Salon Manicure line works most reliably. The polish needs to spread in thin films on water surface—too thick and it won't spread, too thin and colors muddy together.
The setup that finally worked: room temperature filtered water in a disposable cup, Sally Hansen in "Shell We Dance" and "Plum's the Word," toothpick for design creation, and liquid latex around fingers.
Pro tip I learned painfully: drop polish from 2 inches above water surface. Too high creates bubbles, too low doesn't spread properly.
Negative Space Geometric
Difficulty: Intermediate | Time: 30 minutes
These designs leave portions of natural nail visible, creating modern, architectural looks. I use striping tape ($5 for 10 rolls on Amazon) to create clean lines and geometric cutouts.
The process: apply base coat, place tape in desired pattern, paint over everything with color, remove tape immediately while polish is wet. Seche Vite top coat seals everything.
Testing revelation: cheap striping tape works better than expensive vinyl. It's thinner and conforms to nail curves without lifting. Remove tape at a 45-degree angle for cleanest lines.
This design consistently lasts longer than full-coverage art—less surface area means fewer chip opportunities. I got 10 days wear from this technique.
Key Finding: Negative space designs create visual interest while requiring fewer polish layers, reducing chip risk and drying time — Essie How-To Guide
Dotted Patterns
Difficulty: Beginner | Time: 25 minutes
Polka dots, flower petals, and abstract patterns using dotting tools or improvised alternatives. I've used bobby pin ends, pencil erasers, and actual dotting tools—all create different effects.
The surprise winner: bobby pins. The rounded end makes perfect medium dots, and you probably own several. Dip in polish, dot onto nail, clean with acetone between colors.
Pattern that always works: five-dot flower (center dot with four petals around it). Use white dots over any colored base, or colored dots over white base. Simple but looks intentional and artistic.
Timing matters: create dots while base color is completely dry. Tacky base causes dragging and muddy results.
Foil Transfer Art
Difficulty: Intermediate | Time: 35 minutes
Metallic accents that look expensive but cost under $10 total. You need transfer foil sheets and foil adhesive (not regular top coat—I learned this the hard way).
The technique: paint design with foil adhesive, wait until tacky (about 5 minutes), press foil sheet over design, peel away. What remains is metallic design perfectly transferred.
Best foil brand after testing five: Beetles nail foil from Amazon ($8 for 20 sheets). Clean transfers, doesn't tear easily, comes in multiple finishes.
Design tip: less is more. Full-nail foil looks costume-y, but accent lines or small geometric shapes look sophisticated.
French Tip Variations
Difficulty: Beginner to Intermediate | Time: 20-40 minutes
Classic French tips updated with colored tips, angled lines, or multiple thin lines instead of single thick ones. French manicure guides ($3) make this achievable for shaky hands.
My breakthrough: skip white tips entirely. Use any color that contrasts with your base. Navy tips over nude base, coral tips over white base, black tips over gray base.
For perfect application: apply guides to completely dry base color, paint tips, remove guides immediately. OPI "Alpine Snow" remains the most opaque white for traditional tips, but Essie "Licorice" creates dramatic black tips.
Double-tip variation: two thin lines instead of one thick tip. Use striping brush for precision.

Textured Matte Designs
Difficulty: Beginner | Time: 15 minutes
Matte top coat transforms any regular manicure into something editorial. I tested six matte top coats—Essie Matte About You ($9) gives the most even, velvety finish.
The surprise technique: selective matte application. Paint regular glossy manicure, then use small brush to apply matte top coat only to specific areas. Creates contrast between matte and glossy sections.
Pattern ideas that work: matte French tips with glossy base, matte geometric shapes over glossy color, matte accent nail with glossy others.
Warning: matte shows fingerprints and scratches more than glossy. Plan accordingly for longevity.
Glitter Placement Art
Difficulty: Beginner | Time: 20 minutes
Strategic glitter application rather than all-over sparkle. Use tweezers to place individual glitter pieces or larger sequins in deliberate patterns.
My glitter hierarchy after extensive testing: holographic hex glitter for maximum impact, fine glitter for subtle sparkle, chunky glitter for statement nails. Dollar Tree actually stocks decent craft glitter that works for nails.
Application method: paint base color, place glitter while slightly tacky using tweezers, seal with top coat. Don't dump glitter onto wet polish—it clumps and looks messy.
Easy pattern: diagonal line of glitter across nail, or glitter constellation with random placement.
Marble Effect with Plastic Wrap
Difficulty: Beginner | Time: 25 minutes
Creates organic, stone-like patterns using crumpled plastic wrap pressed into wet polish. More controlled than water marbling but still gives organic results.
The technique: apply base color, immediately crumple plastic wrap and dab or press into wet polish, remove wrap, seal with top coat while everything's still slightly wet.
Color combinations that consistently work: gray over white (marble effect), gold over black (dramatic contrast), pink over white (rose quartz look).
Plastic wrap discovery: saran wrap is too smooth—use thicker plastic like sandwich bags for better texture transfer.
Key Finding: Layering techniques like plastic wrap marbling require working while polish remains workable, typically within 30-60 seconds of application — OPI Blog
Mixed Media Collage
Difficulty: Advanced | Time: 50 minutes
Combining multiple techniques in one manicure: stamping on some nails, gradient on others, negative space on accent nails. This creates cohesive editorial-looking sets.
The planning phase matters most. Choose 2-3 colors maximum and repeat them across different techniques. Example: nude base with black stamping on thumb and ring finger, black-to-nude gradient on middle finger, negative space black triangles on index and pinky.
What I learned: odd numbers work better visually. Three nails with technique A, two nails with technique B looks more balanced than alternating patterns.
This approach lets you practice multiple skills in one session while creating Instagram-worthy results.
Design Comparison Table
| Design | Skill Level | Time | Key Products | Longevity |
|---|---|---|---|---|
| Line Art | Beginner | 15 min | Striping brush, liner polish | 8+ days |
| Gradient | Intermediate | 45 min | Makeup sponges, liquid latex | 5-7 days |
| Stamping | Beginner | 20 min | Stamping plate, special polish | 7-10 days |
| Water Marble | Advanced | 60 min | Sally Hansen polish, filtered water | 3-5 days |
| Negative Space | Intermediate | 30 min | Striping tape, base coat | 10+ days |
| Dotted | Beginner | 25 min | Bobby pins or dotting tools | 6-8 days |
| Foil Transfer | Intermediate | 35 min | Transfer foil, special adhesive | 4-6 days |
| French Variations | Beginner-Int | 20-40 min | French guides, contrast colors | 8-10 days |
| Matte Designs | Beginner | 15 min | Matte top coat | 5-7 days |
| Glitter Placement | Beginner | 20 min | Tweezers, various glitters | 7-9 days |
| Plastic Wrap | Beginner | 25 min | Plastic bags, contrasting polish | 6-8 days |
| Mixed Media | Advanced | 50 min | Multiple technique supplies | Varies |
What Techniques Should You Start With?
Begin with dotted patterns or line art if you're completely new to nail art. Both forgive minor mistakes and require minimal investment in tools. Stamping offers the biggest impact for effort ratio once you master the pressure technique.
Avoid water marble and mixed media until you're comfortable with basic application and have steady hands. These techniques demand precision and timing that comes with practice.
For durability, prioritize negative space and French variations—less layered product means fewer failure points. Save foil and glitter techniques for special occasions since they chip faster.
Most importantly, practice on one accent nail first rather than committing to full manicures while learning. You can always expand successful techniques to more nails once you've mastered the basics on a single digit.
- Achieve smooth gradient nails by using damp makeup sponges, outperforming expensive ombre brushes.
- Born Pretty stamping plates and specific stamping polish create salon-quality designs quickly and affordably.
- For water marble techniques, Sally Hansen polishes offer the most reliable consistency for best results.
- Negative space nail art designs last significantly longer, extending wear by 5-7 days.
Frequently Asked Questions
What Techniques Should You Start With?
Begin with dotted patterns or line art if you're completely new to nail art. Both forgive minor mistakes and require minimal investment in tools. Stamping offers the biggest impact for effort ratio once you master the pressure technique.