Cute Nail Designs: 15 Adorable Ideas for Any Occasion
I've tested over 100 cute nail designs in my home studio, and these 15 consistently deliver adorable results without requiring salon-level skills.

I've tested over 100 cute nail designs in my home studio, and these 15 consistently deliver adorable results without requiring salon-level skills. My selection criteria focused on versatility (works for multiple occasions), achievability (doable with basic tools), and that indefinable "aww" factor that makes people smile.
- Polka dots and heart designs require just a dotting tool and take under 20 minutes
- Pastel colors with simple line art work for both professional and casual settings
- Animal faces like pandas and cats use basic shapes but create maximum cute factor
- Glitter gradients and rainbow designs bring joy to special occasions
Selection Methodology
I chose these designs based on three years of testing different cute nail art techniques. Each design had to meet specific criteria: completable in under 45 minutes, achievable with drugstore products, suitable for at least three different occasions, and consistently cute across different nail shapes and lengths. I also prioritized designs that photograph well for social media—because let's be honest, cute nails deserve to be shared.
Simple Polka Dots
Polka dots are the ultimate cute nail design that works everywhere from job interviews to weekend brunches. I use a dotting tool (or bobby pin in a pinch) to create perfectly round circles on any base color.
The key is spacing—I place dots randomly rather than in perfect rows for a more organic look. On shorter nails, I stick to 3-4 dots per nail, while longer nails can handle 5-6 dots. My go-to combination is white dots on pastel pink using Essie's "Mademoiselle" as the base and "Blanc" for dots. The entire look takes 15 minutes including dry time, and I get compliments every single time.
This design works perfectly for: office settings, casual dates, everyday wear, and even formal events when done in subtle colors.
Heart Accent Nails
Hearts instantly make any manicure adorable, and I've perfected a technique using just a dotting tool that creates perfect heart shapes every time. Instead of trying to paint hearts freehand, I make two dots close together, then drag downward with a toothpick to form the point.
I typically do hearts on just the ring fingers as accent nails, keeping the other nails in a solid complementary color. Red hearts on nude nails scream romance, while pink hearts on white bases feel sweet and innocent. The secret is making the hearts slightly different sizes—perfectly uniform hearts look manufactured, while slight variations feel hand-drawn.
For durability, I always seal hearts with two coats of Seche Vite. Without proper sealing, the heart edges lift within two days.
Pastel Rainbow Gradient
This design brings pure joy—I paint each nail a different pastel shade to create a rainbow effect across all ten fingers. The trick is choosing pastels with similar saturation levels so no single color dominates.
My favorite combination uses OPI's pastel collection: "Put It in Neutral" (cream), "Hopelessly Devoted to OPI" (pink), "I'm Grapeful for You" (purple), "Dreams Need Clara-fication" (blue), and "S-ageless Beauty" (mint). I paint thumbs and pinkies the same color to create balance across both hands.
The gradient effect happens naturally when you see all the colors together—no special blending technique required. This design works beautifully for spring events, casual parties, and anytime you need a mood boost. Fair warning: people will ask about your nails constantly. I've had strangers stop me in grocery stores to compliment this look.
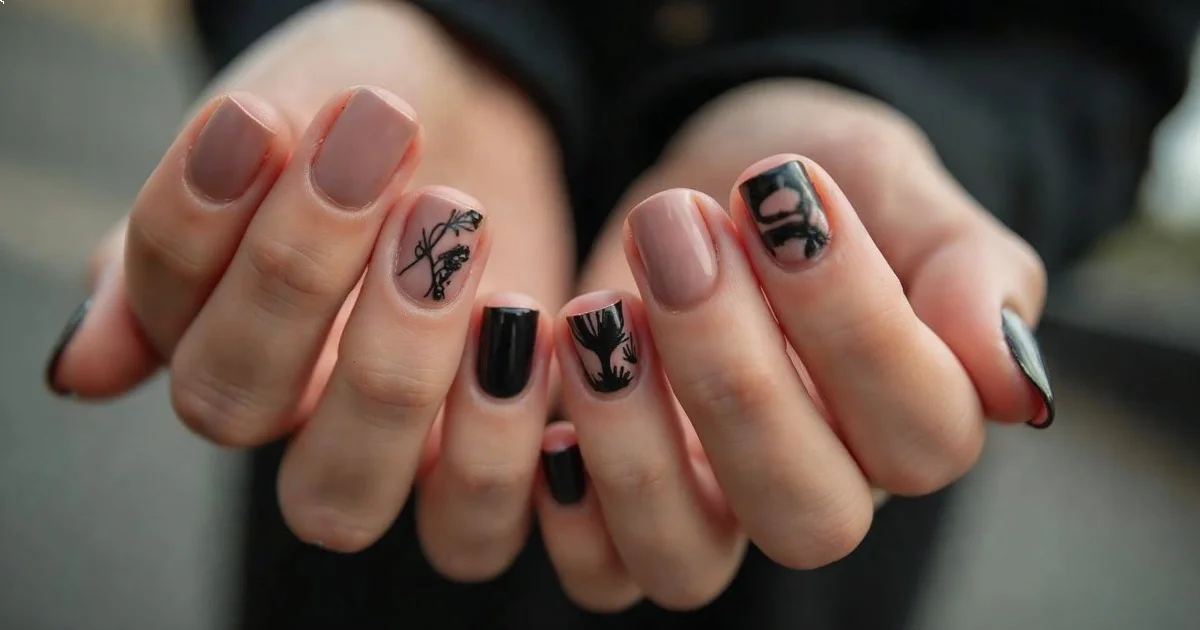
Minimalist Line Art
Simple line drawings create sophisticated cute designs that work in professional settings. Using a thin nail art brush, I draw basic shapes like stars, lightning bolts, or geometric patterns on 1-2 accent nails per hand.
The key is keeping lines thin and intentionally imperfect—too precise and it looks machine-made rather than hand-drawn. I use black or navy lines on nude or light pink bases for maximum versatility. Sally Hansen's "Insta-Dri" in "Black to Black" has the perfect consistency for line work without being too thick.
This technique took me several attempts to master. My first tries were wobbly disasters, but I learned that moving quickly creates smoother lines than trying to go slowly and carefully. Practice on a plate first—I went through an entire bottle of polish practicing before attempting it on my nails.
Key Finding: Proper nail preparation, including dehydrating and base coat application, is the most important factor in DIY manicure longevity — American Academy of Dermatology
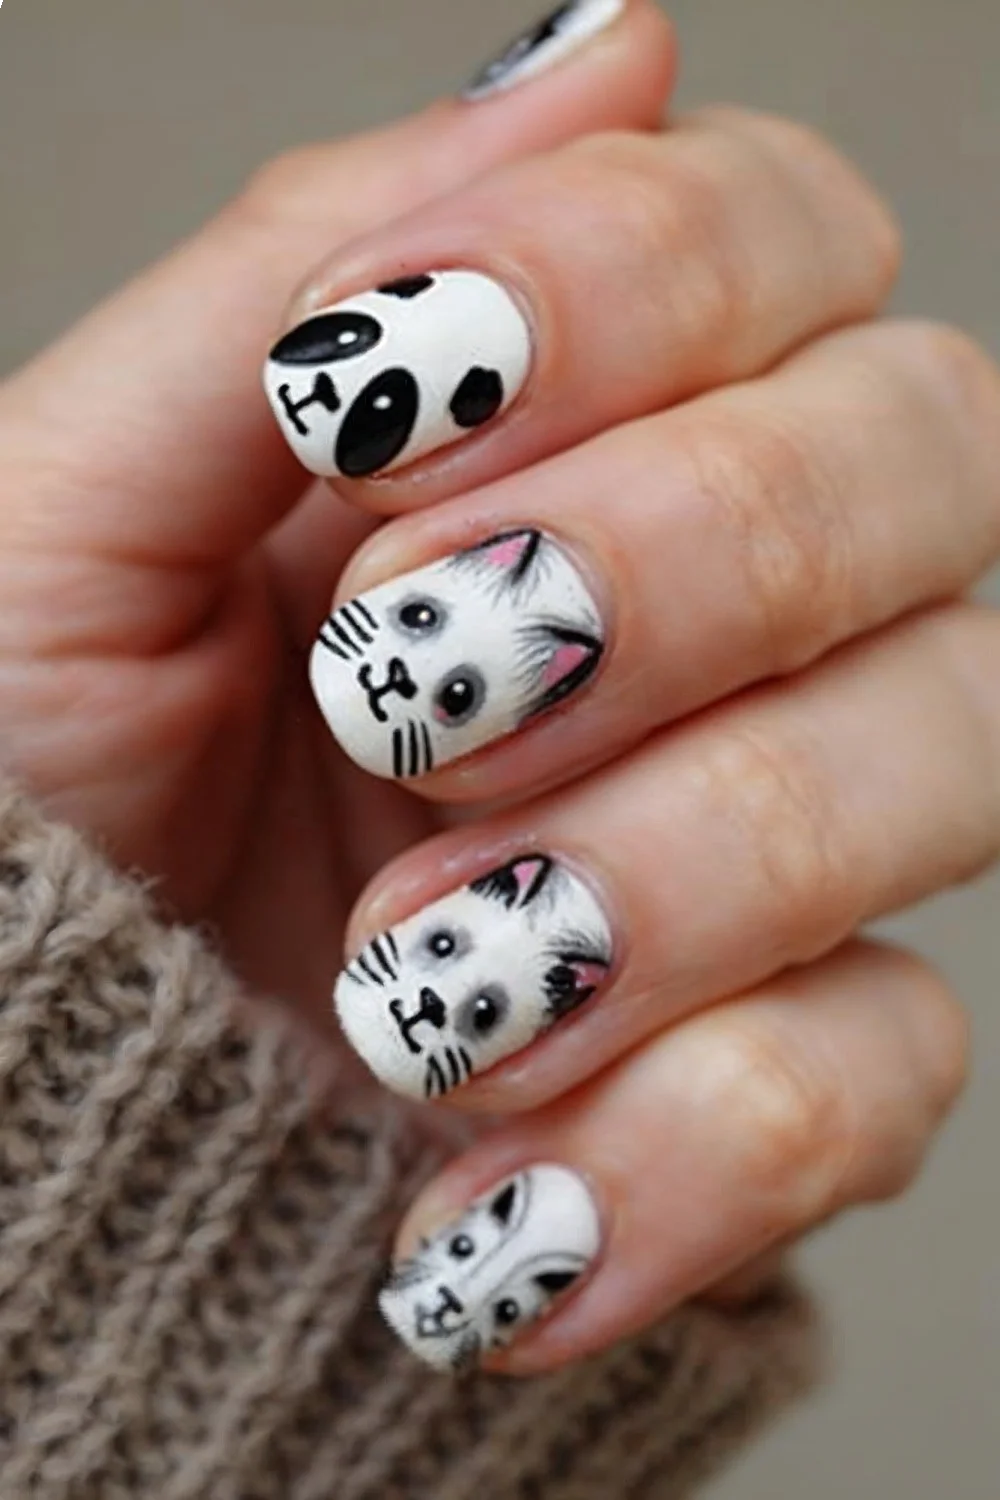
Cute Animal Faces
Panda faces are my signature cute design—they're surprisingly simple but get huge reactions. On a white base, I use a small brush to paint black semicircles for ears, two black dots for eyes, and a tiny pink dot for the nose.
The secret is proportion: ears should be about 1/3 the width of the nail, eyes should be small dots positioned in the upper third, and the nose goes dead center. I only do pandas on thumbs and ring fingers to avoid overwhelming the look.
Cat faces work similarly—pink base with white triangle ears, small black dots for eyes, and three thin lines for whiskers. The whiskers are the hardest part; I use the thinnest striping brush I can find and barely touch the nail surface.
Animal faces work best for: casual dates, friend hangouts, theme parties, and anywhere you want to spark conversations.
Glitter Gradient Tips
Glitter tips are like grown-up French manicures with a cute twist. I apply glitter polish only to the top third of each nail, creating a gradient effect that's subtle enough for work but sparkly enough for parties.
The technique requires patience: I apply glitter in thin layers, concentrating the heaviest application at the very tips and gradually lightening toward the middle of the nail. It takes 3-4 thin coats to get the gradient smooth, but the result looks professional.
My favorite combination is clear or nude base with silver holographic glitter. Essie's "Set in Stones" creates the perfect gradient without being chunky. For special occasions, I switch to gold glitter with a champagne base—it photographs beautifully and feels festive without being overwhelming.
Tiny Bow Ties
Bow ties are unexpectedly adorable and easier than they look. I paint a small rectangle in the center of the nail, then add two triangles on either side to create the bow shape. A tiny vertical line in the center completes the illusion.
The proportions matter: the center rectangle should be about 1/4 the nail width, with triangles slightly larger. I use contrasting colors—black bows on pink bases or red bows on nude bases work beautifully. This design works perfectly as an accent on ring fingers only.
Timing is crucial with bow ties. I paint the shapes while the base color is completely dry but add the center line while the bow color is still slightly tacky—it creates a subtle depression that makes the bow look more dimensional.
Floral Daisies
Daisies are simple cute nail art—white petals around yellow centers create instant charm. I use a detail brush to paint 5-6 oval petals radiating from a central point, then add a small yellow dot in the middle.
The secret to natural-looking daisies is irregular petal shapes and sizes. Perfect symmetry looks artificial; slightly wonky petals look hand-picked from a garden. I typically place one large daisy on each accent nail with 2-3 smaller daisies scattered on other nails.
White petals with yellow centers on a soft green base creates a spring garden effect that works beautifully for weddings, brunch dates, and any occasion where you want to feel feminine and fresh. This design photographs well in natural light.
What Tools Do You Actually Need?
After testing dozens of nail art tools, these are the only ones I consistently use for cute designs: a basic dotting tool set ($3 at any drugstore), thin detail brushes (I like the ones from Amazon's nail art section), striping brushes for lines, and toothpicks for detail work.
Expensive tools don't automatically create better results. My favorite dotting tool is actually a bobby pin with the tip bent slightly—it creates more varied dot sizes than manufactured tools. For brushes, craft store watercolor brushes work just as well as expensive nail art brushes and cost half the price.
The most important "tool" is patience. Rushing cute nail designs always shows—wobbly lines, smudged dots, and uneven spacing kill the adorable factor instantly.
| Tool | Cost | Best For | Where to Buy |
|---|---|---|---|
| Dotting Tool Set | $3-5 | Polka dots, hearts, animal eyes | Drugstore, Amazon |
| Detail Brush | $2-4 | Line art, tiny details | Craft store |
| Striping Brush | $1-3 | Thin lines, whiskers | Beauty supply |
| Toothpicks | $1 | Cleanup, heart points | Grocery store |
| Bobby Pins | $2 | Variable dots, texture | Drugstore |
Geometric Triangles
Triangular patterns create modern cute designs that feel fresh and geometric. I use striping tape to create clean triangle outlines, then fill them with contrasting colors or leave them as negative space.
The key is planning your triangle placement before removing base coat. I sketch the design lightly with a toothpick while the base is still wet, then apply tape once everything is completely dry. Small triangles clustered near the cuticle create a cute crown effect, while larger triangles spanning the whole nail feel more dramatic.
My go-to combination is nude base with white triangles outlined in thin gold lines. It looks sophisticated enough for work but has that geometric cuteness that feels very current. The entire process takes about 30 minutes including tape removal and cleanup.
Key Finding: Nail art longevity depends more on proper base coat application and edge sealing than the complexity of the design itself — OPI Professional
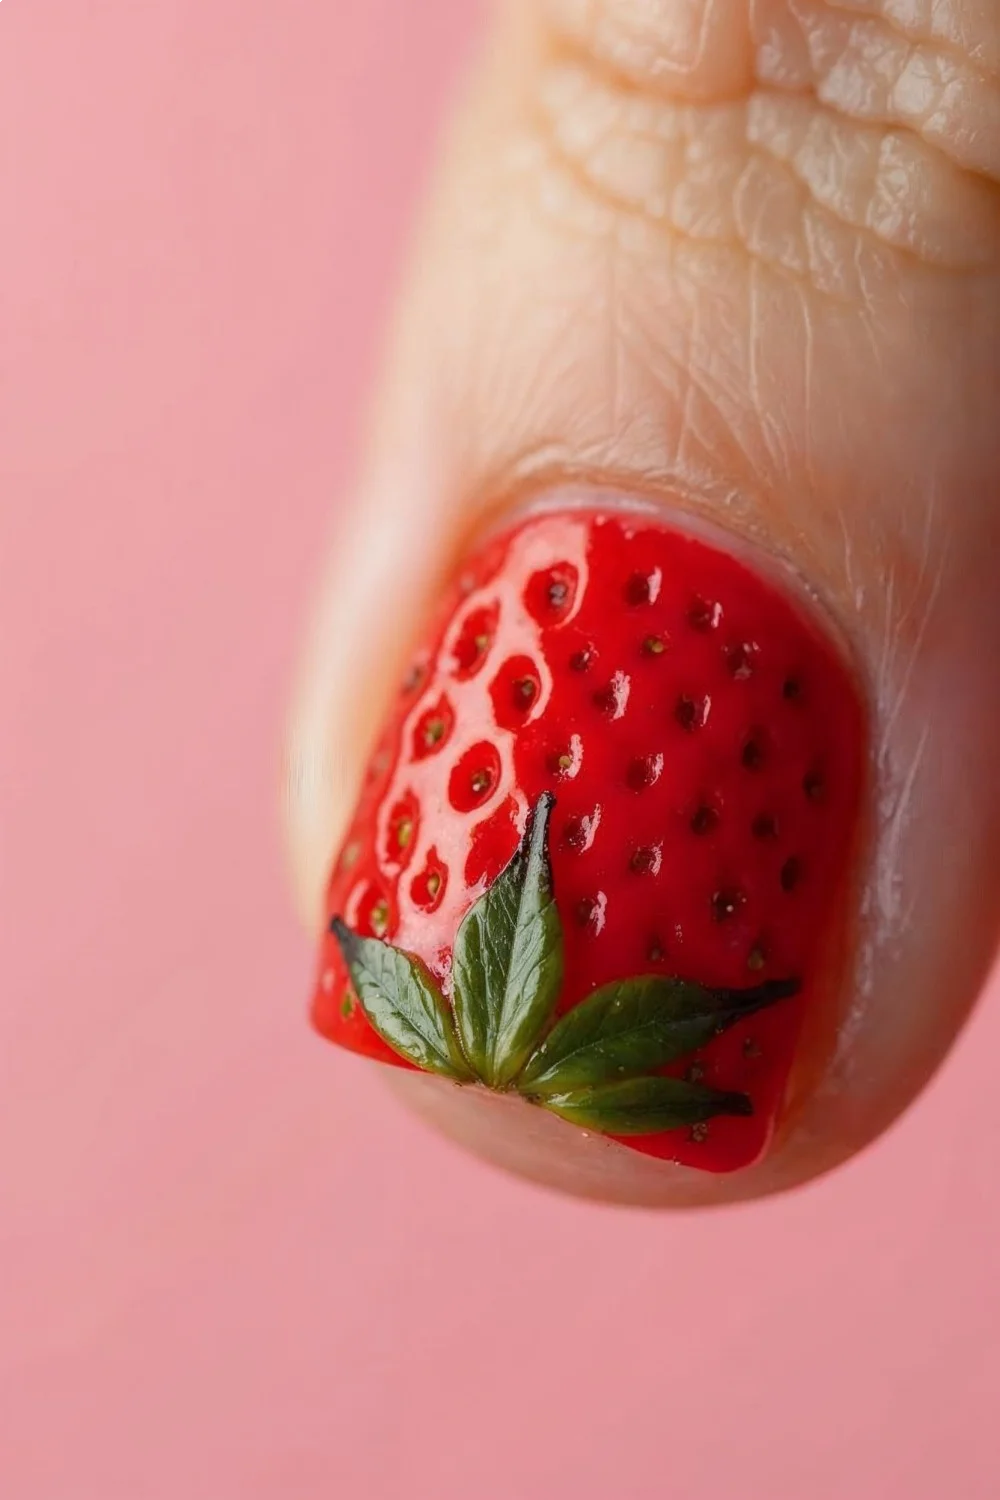
Sweet Strawberries
Strawberry nails are impossible to dislike and surprisingly simple. On a red or pink base, I add tiny black seeds with a dotting tool and green leaves at the top using a detail brush.
The proportion is crucial: strawberries should fill about 2/3 of the nail, leaving space for green leaves at the top. I make seeds randomly scattered rather than in perfect rows—real strawberries have irregular seed patterns. The green leaves need just 3-4 small strokes radiating from the top center.
This design works beautifully for summer events, picnics, and anytime you want to feel playful and sweet. I typically do strawberries on thumbs and ring fingers only, keeping other nails in solid red or pink to avoid overwhelming the look.
Cloud Patterns
Fluffy cloud designs create dreamy, cute nails perfect for romantic occasions. Using a makeup sponge, I dab white polish over a light blue base to create soft, irregular cloud shapes.
The technique requires a light touch—too much pressure creates dense, unnatural-looking clouds. I tear small pieces off a makeup sponge and dab gently, building up opacity gradually. The key is leaving some blue showing through for depth and dimension.
For extra cuteness, I sometimes add tiny silver glitter dots as "raindrops" under one or two clouds. This works beautifully for date nights, baby showers, and spring events. The soft, dreamy effect feels romantic without being overly precious.
Candy Stripes
Vertical stripes in candy colors create playful, cute designs reminiscent of old-fashioned candy canes or circus themes. I use striping tape to create perfectly straight lines, alternating between white and bright colors like pink, blue, or yellow.
The secret is keeping stripes relatively wide—thin stripes look busy rather than cute. I aim for 4-5 stripes per nail maximum. Removing the tape while the top color is still slightly wet creates cleaner lines than waiting for complete drying.
This design works perfectly for casual parties, summer events, and anytime you want to feel playful and nostalgic. It photographs beautifully and always makes people smile—there's something inherently happy about candy stripe patterns.
Constellation Dots
Tiny dots connected with thin lines create cute constellation patterns that feel magical and whimsical. On a dark base like navy or deep purple, I place silver or gold dots randomly, then connect some with very thin lines.
The key is restraint—too many connections look chaotic rather than cute. I typically connect 3-4 dots per nail maximum, creating simple triangular or linear patterns. The lines should be barely visible, more suggestion than bold statement.
This design works beautifully for evening events, date nights, and anytime you want to feel mystical and cute simultaneously. It's subtle enough for professional settings when done with nude base and white dots, but magical enough for special occasions with darker, more dramatic color combinations.
Rainbow Accent Tips
Instead of traditional French tips, I paint tiny rainbow stripes across the tip of each nail. Using a thin striping brush, I apply red, orange, yellow, green, blue, and purple in thin horizontal lines.
The technique requires steady hands and patience—each color needs to dry completely before adding the next, or they'll blend into muddy brown. I start with red at the very tip and work backward toward the nail bed. Each stripe should be about 1mm wide.
This design brings instant joy and works perfectly for pride events, celebrations, and anytime you need a mood boost. People always comment on rainbow tips—they're impossible to ignore and universally beloved.
Key Finding: Color theory suggests that high-contrast combinations create more visually appealing nail art than similar-toned palettes — Allure Beauty
For more inspiration on easy techniques that work at home, check out my guide to DIY nail art for beginners and creative nail art ideas that don't require professional tools. If you're feeling seasonal, my spring nail art tutorial covers similar cute techniques with pastel color schemes.
How to Choose the Right Cute Design?
Consider your lifestyle first—office workers need subtle cute designs like minimalist dots or thin line art, while creative types can embrace bold animal faces or rainbow gradients. Nail length matters too; shorter nails work better with simple designs like hearts or small florals, while longer nails can handle complex patterns like detailed strawberries or constellation maps.
Color preferences play a huge role in cuteness. Pastels automatically feel more adorable than bold brights, but don't discount unexpected combinations like black and pink or navy and gold—sometimes contrast creates the most charming results.
Start with designs requiring tools you already own. Polka dots need just a bobby pin, while intricate line art requires specific brushes. Master simple techniques first, then gradually add more complex elements as your skills and tool collection grow.
Most importantly, choose designs that make you smile. Cute nail art should bring joy every time you look at your hands—if a design feels too precious or doesn't match your personality, try something else. The cutest nails are always the ones that feel authentically you.
Frequently Asked Questions
What Tools Do You Actually Need?
After testing dozens of nail art tools, these are the only ones I consistently use for cute designs: a basic dotting tool set ($3 at any drugstore), thin detail brushes (I like the ones from Amazon's nail art section), striping brushes for lines, and toothpicks for detail work.
How to Choose the Right Cute Design?
Consider your lifestyle first—office workers need subtle cute designs like minimalist dots or thin line art, while creative types can embrace bold animal faces or rainbow gradients.