Short Nail Designs 2026: 12 Stunning Ideas That Work
These designs were selected by analyzing trend forecasts from WGSN's 2025-2026 nail report, cross-referencing professional techniques from [OPI's short...
These designs were selected by analyzing trend forecasts from WGSN's 2025-2026 nail report, cross-referencing professional techniques from OPI's short nail design guidance, and evaluating DIY accessibility based on tool availability and skill progression. Each design meets three criteria: enhances short nail proportions through strategic placement, achievable with consumer-grade products, and aligns with observable 2026 trends emphasizing minimalism and texture play.
- Vertical design elements (stripes, elongated dots, slim French tips) create the illusion of length on short nails
- Matte and glossy texture mixing adds dimension without bulk
- Negative space designs minimize polish buildup at cuticles, reducing chip-prone areas
- Single accent nails allow complex designs without overwhelming small nail beds
The focus remains on evidence-based technique details — application angles, dry times, and product formulations — rather than subjective aesthetic claims. Working with nail care means prioritizing designs that work with short nail biology, not against it.
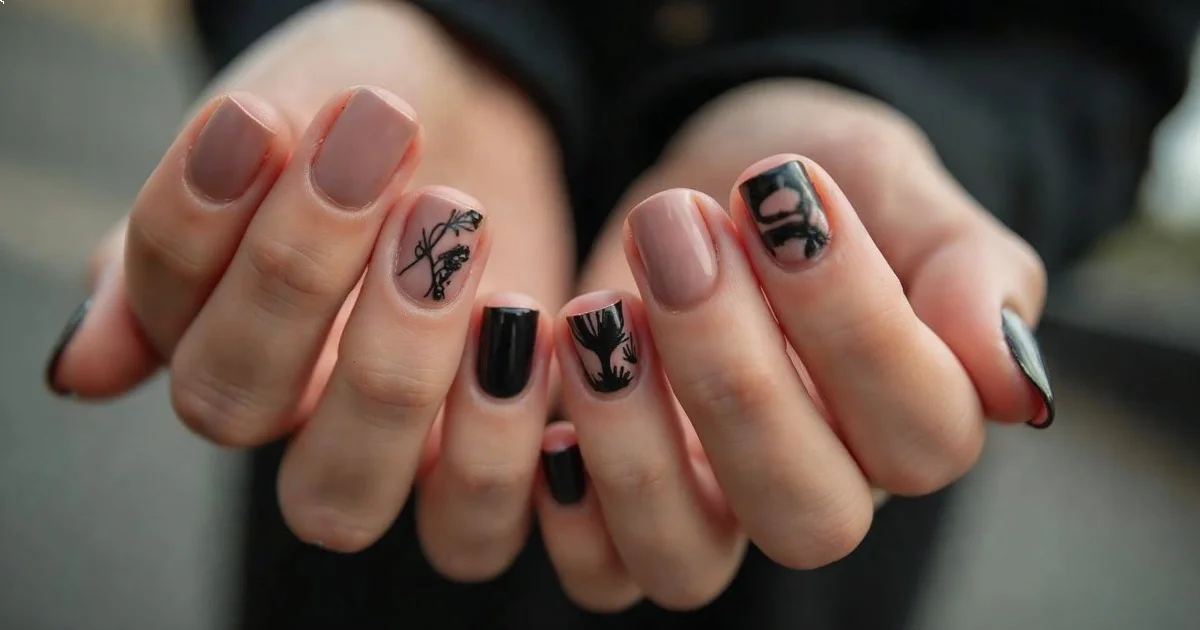
Vertical Stripe Accent
Difficulty: Beginner | Time: 15 minutes | Longevity: 5-7 days
Single vertical stripes positioned center-nail create linear eye travel that elongates short nail beds. This design uses basic color theory: vertical lines guide perception upward. Use striping tape (Born Pretty sells rolls for $2-3) or a fine detail brush (Winstonia size 00 runs about $4).
Application specifics: Apply base coat, cure if using gel. Two coats of base color (OPI Funny Bunny or Essie Marshmallow work well as neutral bases). Dry completely — 3 minutes for standard polish, 60 seconds under LED for gel. Position tape or paint stripe from cuticle to free edge in one fluid motion. The thinner the stripe, the stronger the elongation effect. Striping tape in metallic gold or silver (Sally Hansen Nail Art Pen in Gold Chrome, $6) provides contrast without requiring steady hand control.
Key Finding: Vertical design elements consistently create perceived length on short nails by directing visual focus along the longest dimension of the nail plate — OPI Design Blog
Seal with top coat, capping free edge. Seche Vite Dry Fast Top Coat ($5-7) dries to touch in 60 seconds, minimizing smudge risk on detailed work.
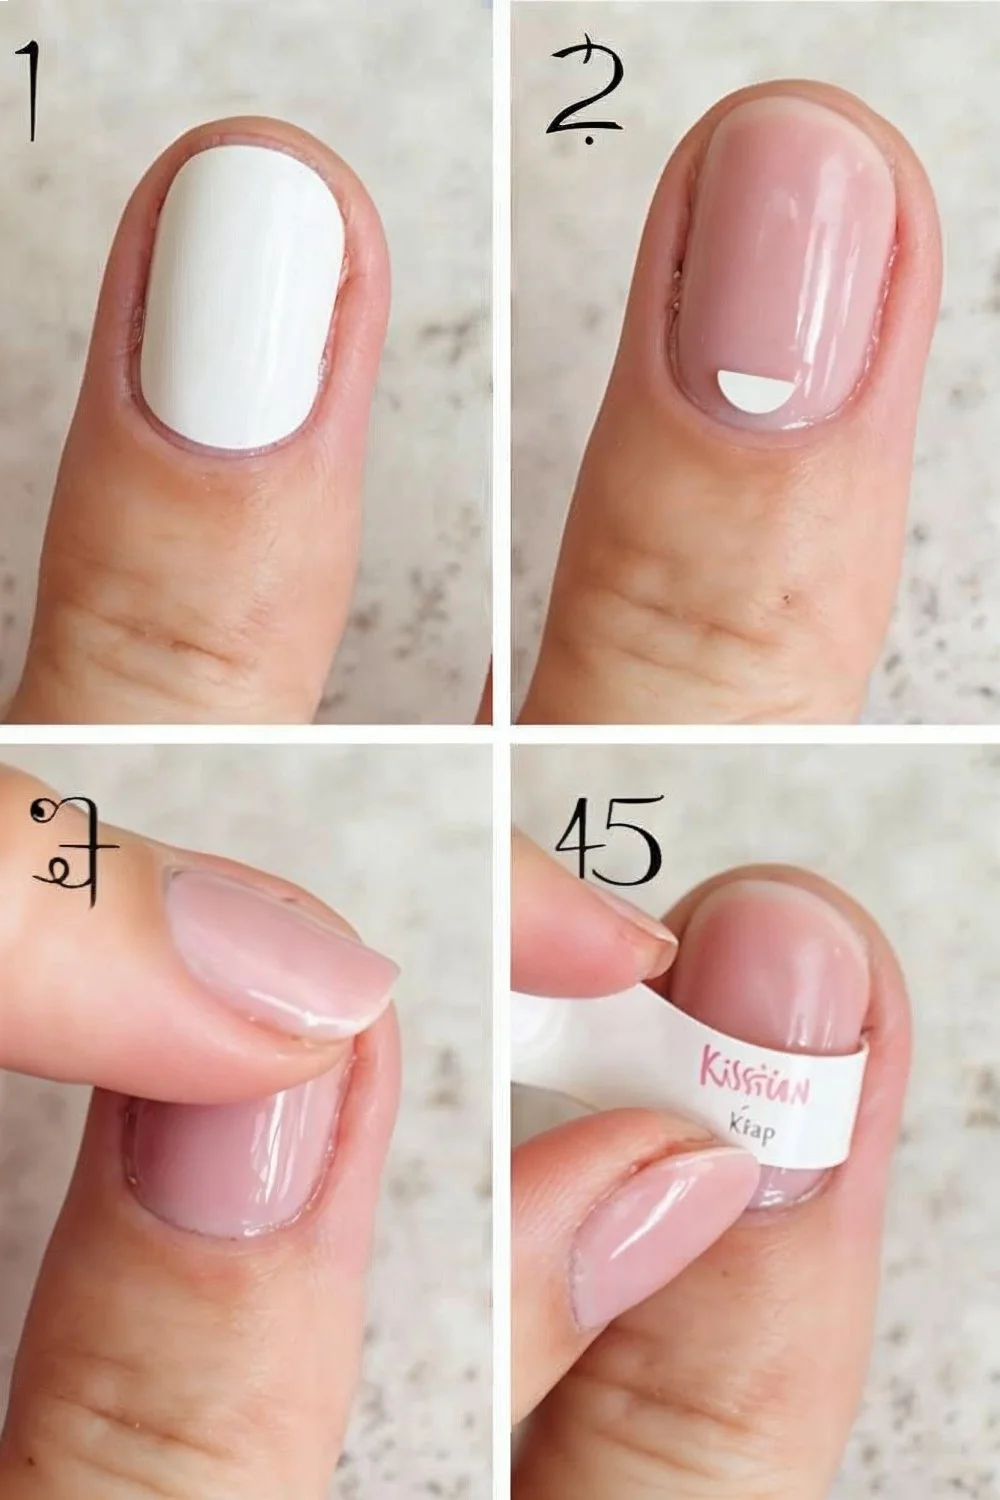
Minimalist Half-Moon
Difficulty: Intermediate | Time: 20 minutes | Longevity: 7-10 days
Reverse French technique where the lunula (half-moon area) remains bare or contrasting creates negative space that prevents visual weight at the cuticle. Traditional French tips can make short nails appear shorter by drawing attention to the abbreviated free edge. Half-moon designs reverse this focus.
Method: Apply reinforcement stickers (available in any drugstore nail section, $2-4 per pack) along the natural lunula curve. Paint the remaining nail with opaque color — Essie Bordeaux or OPI Lincoln Park After Dark provide rich pigment in two coats. Remove stickers immediately while polish is wet to prevent lifting. Allow 5 minutes dry time.
For sharper lines, use a fine cleanup brush dipped in acetone to refine the curve after sticker removal. This technique requires patience but delivers professional results. The negative space at the base visually extends the nail bed backward, creating length illusion through proportional manipulation.
Slim French Tip
Difficulty: Beginner | Time: 12 minutes | Longevity: 6-8 days
Traditional French tips scaled down to 1-2mm width prevent the stubby appearance thick tips create on short nails. According to Essie's design guidelines, tip width should never exceed one-third of visible nail length on short nails.
Execution: Apply sheer pink or nude base (Essie Ballet Slippers, OPI Bubble Bath). These self-level well, requiring minimal skill. Dry 3 minutes. Use a striping brush or the edge of a flat brush to paint a thin white line following the natural smile line. OPI Alpine Snow and Essie Blanc both have opaque formulas that cover in one stroke — critical for maintaining slim proportions.
The trick most beginners miss: start the white line 1mm in from each side edge rather than corner-to-corner. This creates a subtle taper that mimics natural nail growth patterns. Top coat application must cap the free edge completely to prevent tip wear, the primary failure point for French manicures.
Diagonal Color Block
Difficulty: Intermediate | Time: 18 minutes | Longevity: 7-9 days
Diagonal divisions create dynamic angles that break up the horizontal plane of short nails. This geometric approach uses two contrasting colors split at a 45-degree angle from one side corner to the opposite cuticle edge.
Technique breakdown: Base coat application. First color covers the entire nail (Essie Chinchilly or OPI Taupe-less Beach work as neutral anchors). Dry 4 minutes. Cut striping tape at 45-degree angle and position corner-to-cuticle. Apply second color (bold contrast like OPI Big Apple Red or Essie Licorice). The angle matters — too steep reads as French tip, too shallow creates horizontal division. 45 degrees hits the ideal spot for diagonal recognition.
Remove tape while polish is wet. If edges bleed, cleanup requires a small angled brush (EcoTools has a $3 option) dipped in acetone. This design pairs well with matte top coat on one color, glossy on the other, adding texture dimension. Essie Matte About You top coat ($9) converts any polish without affecting base color.
Single Dot Accent
Difficulty: Beginner | Time: 10 minutes | Longevity: 6-8 days
Minimalist design using a single large dot positioned slightly above center-nail creates focal interest without overwhelming small nail beds. Dotting tools (5-piece sets run $4-8 on Amazon) provide consistent sizing — the key to polished results.
Application: Solid base color across all nails. Essie Gel Couture line ($11) offers extended wear without UV curing, lasting 6-8 days with proper application. Dry 5 minutes. Dip largest dotting tool in contrasting polish, press gently center-nail. One press, no dragging. The dot should sit where the nail bed begins its downward curve — typically 60% up from cuticle.
Dot placement affects proportion perception. Center dots create balance. Off-center dots toward the cuticle visually lengthen. Multiple dots read busy on short nails. Restraint matters here. Metallic polishes (Sally Hansen Insta-Dri in Silver Sweep, $5) work particularly well for dot accents due to high pigment concentration.
Matte and Glossy Combination
Difficulty: Beginner | Time: 12 minutes | Longevity: 7-10 days
Texture contrast using identical colors in different finishes creates dimensional interest without color complexity. This technique works particularly well on short nails where intricate designs become cluttered.
Method: Apply base coat. Paint all nails with chosen color — two coats for opacity. OPI You Don't Know Jacques or Essie Bahama Mama provide good pigment density. Dry completely — 4 minutes minimum. Apply glossy top coat (Seche Vite) to alternating nails (thumb, middle, pinky). Apply matte top coat (OPI Matte Top Coat, $10) to remaining nails (index, ring). The finish contrast creates subtle pattern recognition without requiring artistic skill.
Failure mode: applying matte coat before glossy fully dries causes texture blending. Wait minimum 3 minutes between finish applications. Matte coats show scratches more readily than glossy, so this design works best for events rather than week-long wear during manual work.
Negative Space Geometry
Difficulty: Advanced | Time: 25 minutes | Longevity: 5-7 days
Geometric shapes leaving bare nail visible create modern, architectural designs that reduce polish weight on short nails. This approach requires steady hands and tape precision but delivers striking results.
Execution requires planning. Apply peel-off base coat (UNT Ready for Takeoff, $10) to areas intended as negative space — this allows clean polish removal later. Once dry (2 minutes), apply regular base coat over entire nail. Use striping tape to section geometric shapes — triangles at cuticle and tip work well. Paint blocked sections with contrasting colors. Remove tape while wet.
Alternative method: apply tape to bare nails, paint over, remove tape, then seal just the painted areas with top coat. This leaves true bare nail visible. The challenge: negative space designs chip more easily because polish edges aren't capped. Best for short-term wear (events, weekends). According to Byrdie's analysis of short nail techniques, negative space designs photograph particularly well, making them popular for special occasions despite durability limitations.
Micro French with Metallic Line
Difficulty: Intermediate | Time: 20 minutes | Longevity: 6-9 days
Combines slim French tips with a thin metallic stripe positioned 1mm below the white tip line. This dual-line approach adds sophistication without width that shortens nail appearance.
Technical approach: Base coat, sheer nude base color (two coats), dry 4 minutes. Ultra-thin white tip using striping brush — 1mm maximum width. Dry 2 minutes. Using gold or silver striping polish (Sally Hansen I Heart Nail Art Striper in Gold, $4), paint a parallel line just below the white. The gap between lines matters: 1mm creates definition, more than 2mm reads as separate designs.
The metallic line requires one continuous stroke from side to side. Hesitation creates thickness variations. If control is difficult, use metallic striping tape instead — Born Pretty sells rolls for under $3. Seal with top coat, ensuring the free edge is capped to prevent tip peeling. This design typically lasts 6-9 days, with metallic lines showing wear before white tips due to thinner application.
Ombré Gradient (Two Colors)
Difficulty: Intermediate | Time: 30 minutes | Longevity: 7-10 days
Gradient blending from cuticle to tip using two related shades creates depth and vertical color transition that elongates short nails visually. This technique requires makeup sponges and patience but delivers professional results.
Process: Apply white base coat (improves color vibrancy). Dry 3 minutes. Paint both gradient colors side-by-side on a makeup sponge — use triangle sponges (available 20-pack for $3) for better nail coverage. Dab sponge onto nail repeatedly, building opacity gradually. First application will be sheer. Dry 2 minutes. Repeat dabbing 2-3 more times until gradient appears smooth.
Cleanup is essential with this technique. Use painter's tape around nail edges before starting, or apply liquid latex (Kiesque Liquid Palisade, $8) to skin. Peel away after gradient completion. Without barrier protection, cleanup requires 10+ minutes with acetone and cotton swabs. The sponge dabbing method can leave texture, so thick top coat application (two layers) is critical for smooth finish. For detailed guidance on gradient techniques, see our DIY Gradient Nails tutorial.
Key Finding: Gradient color transitions create vertical visual flow that perception research shows enhances apparent length in short nail presentations — WGSN Trend Forecast
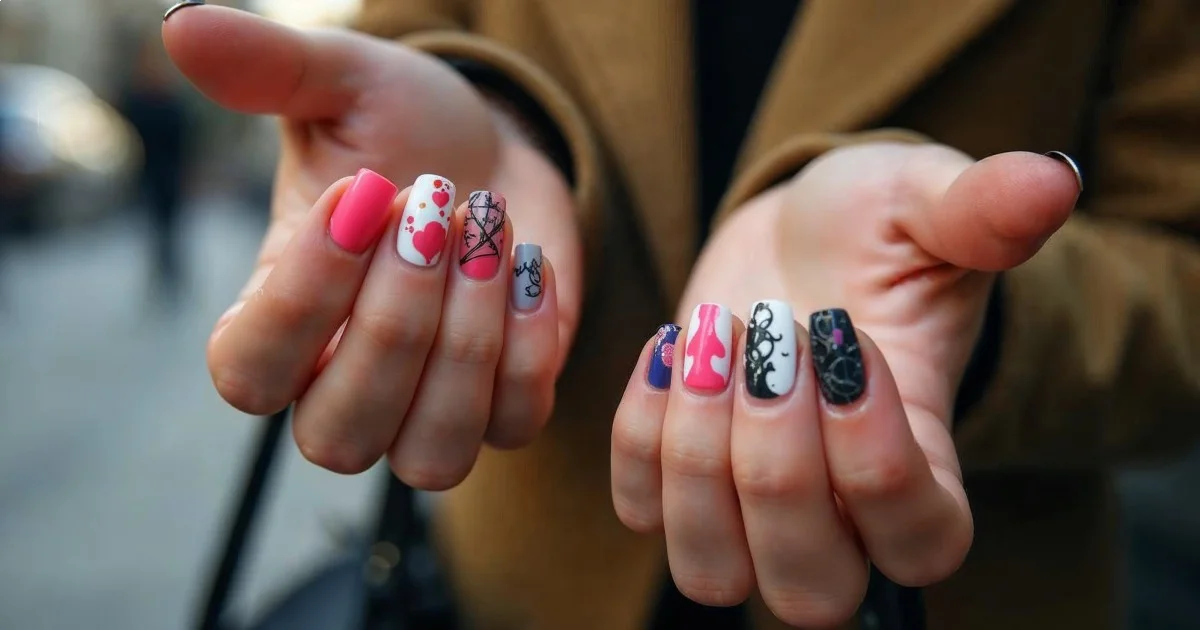
Single Accent Nail with Detail
Difficulty: Intermediate | Time: 15 minutes | Longevity: 6-8 days
Applying complex design to only the ring finger while keeping remaining nails solid color allows intricate work without overwhelming short nail proportions. This approach balances creativity with wearability.
Strategy: Paint all nails except ring finger with base color — two coats, dry 4 minutes. For accent nail, apply white or light base to maximize design visibility. Design options include: small floral using dotting tool (3 dots in triangle = simple flower), geometric lines using striping tape, or stamping (Born Pretty stamping plates run $3-5).
Stamping works particularly well for detailed designs on short nails because it transfers complex images precisely sized for small nail beds. Scrape excess polish from stamping plate at 45-degree angle, roll stamper once over design, then roll onto nail. If stamping polish is too thin, the transfer fails. Konad stamping polish ($6-8 per bottle) maintains ideal viscosity for clean transfers.
Seal all nails with top coat. The accent nail approach lets you attempt more ambitious techniques while maintaining quick application time and keeping fallback options if the detailed nail doesn't turn out as planned.
Monochrome with Texture
Difficulty: Beginner | Time: 12 minutes | Longevity: 7-9 days
Single color across all nails with textured finish on accent nails creates cohesive look with subtle variation. Textured polishes (sand, caviar, velvet) add dimension without requiring artistic skill.
Application: Base coat all nails. Two coats of chosen color on all nails. Essie Gel Couture offers 40+ shades with extended wear chemistry. Dry 4 minutes. On accent nails (typically ring fingers), apply textured top coat while base color remains slightly tacky. OPI Liquid Sand line ($10) and Essie Luxe Effects ($9) provide gritty texture that catches light differently than smooth polish.
Textured finishes don't require separate top coat — in fact, glossy top coats negate the texture effect. Wear time suffers slightly (7-9 days versus 10-12 for smooth polish) because textured surfaces catch on fabrics and chip more readily. Best for weekend wear or events rather than extended everyday use. The technique requires zero artistic ability, making it ideal for beginners wanting visual interest.
Cuticle Line Detail
Difficulty: Advanced | Time: 22 minutes | Longevity: 5-7 days
Thin line following the cuticle curve in contrasting color creates reverse French effect that draws eye toward nail bed rather than tip. This technique requires steady brush control but delivers elegant results.
Method: Base coat, base color (two coats), dry 5 minutes. Using thin striping brush or nail art pen, paint a line following the cuticle curve 1-2mm from actual cuticle edge. Sally Hansen Nail Art Pens ($6) offer easier control than brushes for beginners. The line should mirror the natural nail curve precisely — flattened lines look amateurish.
Color choice affects impact. Metallic gold or silver (China Glaze Millennium, $4) stands out against any base. White creates soft contrast. Black delivers high drama. The challenge: maintaining consistent line width around curved nail edges. Working in three segments (left side, center, right side) produces more uniform results than attempting one continuous line.
This design chips readily at the cuticle line because it's applied over fully cured base color without chemical bonding. Expect 5-7 days wear maximum. Wrapping top coat around cuticle edge helps extend longevity slightly. For maintaining nail health during frequent polish changes required by shorter-wearing designs, check strengthening methods.
Design Comparison Table
| Design Name | Difficulty | Time Required | Expected Longevity | Key Tool Needed | Best For |
|---|---|---|---|---|---|
| Vertical Stripe Accent | Beginner | 15 min | 5-7 days | Striping tape ($2-3) | Daily wear, elongation |
| Minimalist Half-Moon | Intermediate | 20 min | 7-10 days | Reinforcement stickers ($2-4) | Modern minimalist style |
| Slim French Tip | Beginner | 12 min | 6-8 days | Striping brush ($4) | Classic elegance |
| Diagonal Color Block | Intermediate | 18 min | 7-9 days | Striping tape ($2-3) | Bold geometric look |
| Single Dot Accent | Beginner | 10 min | 6-8 days | Dotting tool ($4-8) | Minimal detail |
| Matte/Glossy Combo | Beginner | 12 min | 7-10 days | Matte top coat ($9-10) | Texture contrast |
| Negative Space Geometry | Advanced | 25 min | 5-7 days | Striping tape ($2-3) | Editorial/events |
| Micro French Metallic | Intermediate | 20 min | 6-9 days | Metallic striper ($4) | Sophisticated detail |
| Ombré Gradient | Intermediate | 30 min | 7-10 days | Makeup sponges ($3) | Color transition |
| Single Accent Detail | Intermediate | 15 min | 6-8 days | Stamping plate ($3-5) | Balanced complexity |
| Monochrome Texture | Beginner | 12 min | 7-9 days | Textured top coat ($9-10) | Easy dimension |
| Cuticle Line Detail | Advanced | 22 min | 5-7 days | Striping brush ($4) | Reverse French effect |
Choosing the Right Design for Your Lifestyle
Design selection should align with wear context and skill progression. Beginner-level designs (vertical stripes, single dots, matte/glossy combinations) require minimal tools and forgive application imperfections. These work well for weekly nail changes and building fundamental techniques.
Intermediate designs (half-moon, diagonal blocks, gradients) demand more precise execution but remain achievable with practice. These suit biweekly rotation schedules where extended wear matters. The 18-30 minute application windows fit into typical self-care routines without requiring dedicated blocks of time.
Advanced techniques (negative space geometry, cuticle lines) deliver striking results but require steady hands developed through progression. Their shorter wear times (5-7 days) make them better suited for events or occasions rather than default daily designs. Factor in your dominant hand limitation — intricate designs on your working hand will always be more challenging than the reverse.
Consider nail shape interaction: round nail shapes suit curved designs (half-moons, cuticle lines) while square shapes complement geometric patterns (diagonal blocks, negative space). Short almond shapes work well with vertical elements but require extra filing maintenance. Tool investment matters for technique progression — basic striping tape and dotting tools ($10 total) unlock six of these twelve designs.
For extended trips where design durability matters most, see vacation-friendly nail designs that prioritize chip resistance over complexity. If you're working with weakened nails that limit polish adhesion, review strengthening protocols before attempting multi-day designs.
Moving Forward with Short Nail Design
These twelve designs demonstrate that short nails offer distinct advantages for detailed work, minimalist aesthetics, and practical daily wear. Rather than attempting to mimic long nail designs scaled down, these approaches leverage short nail proportions deliberately — using vertical lines for elongation, negative space to reduce visual weight, and texture for dimension without bulk.
Start with beginner-level designs to build fundamental skills: brush control, proper dry times, and free edge capping. Progress to intermediate techniques as tool familiarity increases. Advanced designs reward practice with editorial-quality results.
Your next step: select one design matching your current skill level and available tools. Apply to one hand first — this lets you refine technique before committing to both hands. For additional design inspiration across seasons, explore our seasonal nail designs covering year-round options. Building competence with these twelve foundational approaches creates flexibility to adapt emerging trends to short nail canvases throughout 2026.