DIY Chrome Nails at Home: Easy Mirror Finish Tutorial 2026
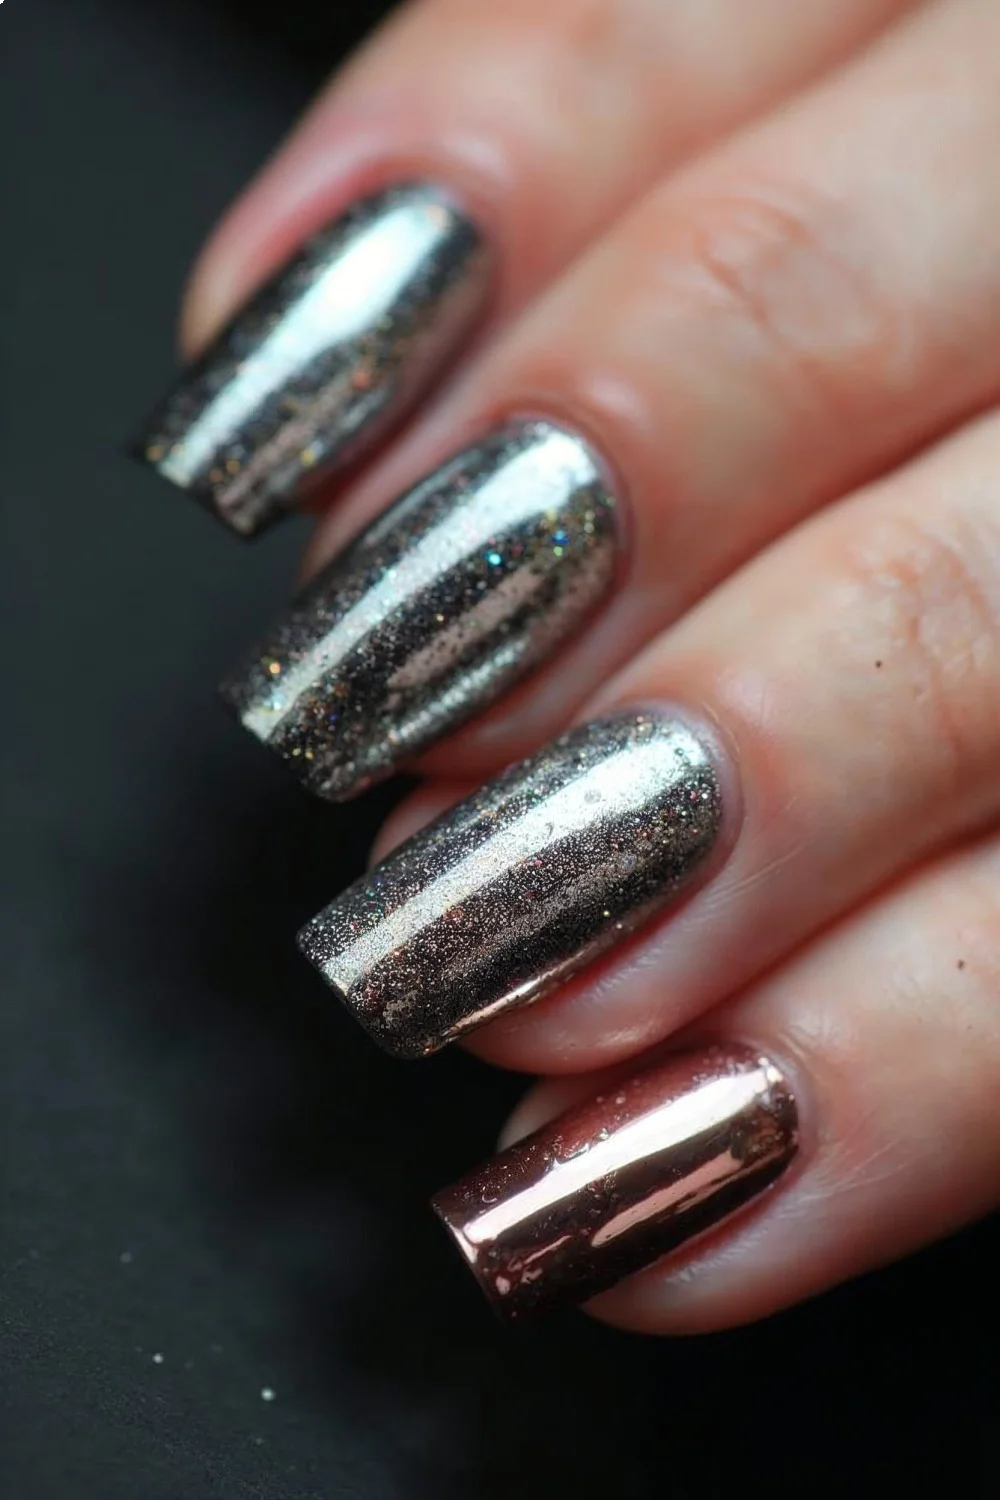
DIY chrome nails deliver a high-shine mirror finish by applying chrome powder over a no-wipe gel top coat, then sealing with a final glossy layer.
DIY chrome nails deliver a high-shine mirror finish by applying chrome powder over a no-wipe gel top coat, then sealing with a final glossy layer. The process takes 45-60 minutes for a full manicure and costs $30-45 for starter supplies that yield 20+ applications.
- Chrome powder requires a no-wipe gel top coat base to adhere properly and create the mirror effect
- Application takes 5-10 seconds per nail with an eyeshadow applicator or silicone tool for even coverage
- Proper buffing and degreasing before application prevents patchy results and extends wear to two weeks
- Multi-chrome and color-shifting powders dominate 2026 trends, offering dimensional effects under different lighting
Based on industry research and professional techniques from established brands like OPI, this guide explains the chemistry behind chrome application and why specific product sequences matter. The mirror finish that defines chrome nails requires precise technique and product compatibility to achieve professional results at home.
What You'll Accomplish With This Tutorial
This tutorial walks you through creating salon-quality chrome nails that maintain their mirror finish for 10-14 days. You'll master the specific application sequence that prevents common failures like patchy coverage, premature chipping, and dull results. By the end, you'll understand why product compatibility matters more than brand names, how to troubleshoot streaky application in real-time, and which 2026 chrome variations work best for different nail shapes and skin tones.
Chrome nails are now accessible for home use. Where professional application once required $80+ salon visits, starter kits now retail for $30-45 and provide enough material for 20+ full manicures. According to Cosmopolitan's chrome nail guide, the resurgence of chrome finishes in 2024-2026 has pushed brands to formulate more user-friendly powders that work across multiple gel systems.
Key Finding: Proper nail preparation, including buffing and degreasing, is the most important factor in achieving a seamless chrome mirror finish—Byrdie
Prerequisites and Required Supplies
Before starting, confirm your nails are healthy enough for gel application. If you're recovering from damage, review guidance on strengthening weak nails first. Chrome application requires gel polish as the base system—traditional air-dry polish won't work because chrome powder needs the tacky surface of uncured gel to grip.
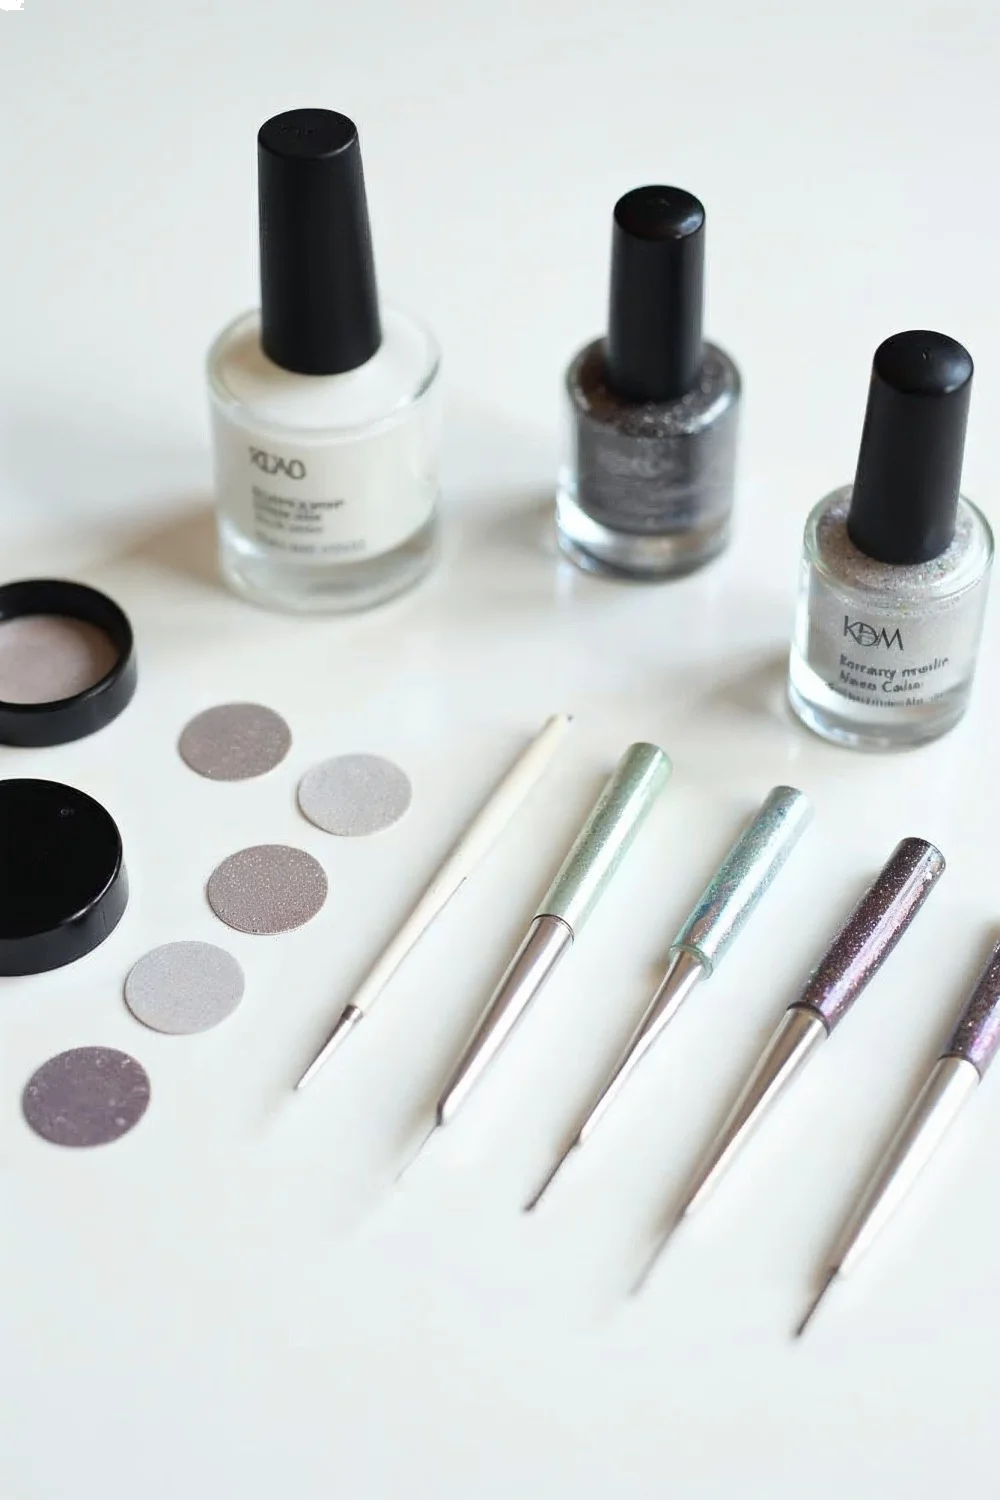
Essential Supplies (Total Cost: $30-45)
| Item | Purpose | Cost Range | Where to Buy |
|---|---|---|---|
| Gel base coat | Foundation layer, prevents staining | $8-12 | Sally Beauty, Amazon |
| Gel color polish (black recommended) | Creates depth under chrome | $7-10 | Drugstore, beauty supply |
| No-wipe gel top coat | Provides tacky layer for powder adhesion | $9-14 | Sally Beauty, Ulta |
| Chrome powder (1-2g jar) | Creates mirror finish | $4-8 | Amazon, Born Pretty |
| LED/UV nail lamp (48W minimum) | Cures gel layers | $15-25 | Amazon, Target |
| Eyeshadow applicators or silicone tools | Buffs powder onto nails | $3-6 for pack | Amazon, craft stores |
| Rubbing alcohol | Degreases nail surface | $2-4 | Drugstore |
| Lint-free wipes | Cleanup without fuzz | $4-6 | Sally Beauty |
| Regular glossy gel top coat | Seals chrome finish | $8-12 | Beauty supply |
Product Compatibility Note: Not all gel top coats work for chrome. You specifically need a "no-wipe" or "non-cleansing" formula—the tacky inhibition layer is what allows powder adhesion. Regular gel top coats cure to a clean finish and chrome powder won't stick. Brands like Gelish, Beetles, and Makartt clearly label their no-wipe formulas.
Optional but Recommended
- Nail file (180-grit) for shaping: $2-4
- Cuticle pusher and nipper: $5-8
- Base coat specifically for gel (if base + color in one): $8-12
- Multiple chrome powder colors: $4-8 each
Skill Level: Beginner-friendly if you've applied gel polish before. First-timers should expect 60-90 minutes for the full process.
Time Requirement: 45-60 minutes for experienced users, including cure times.
Prepare Your Natural Nails
Proper nail preparation determines whether your chrome manicure lasts 4 days or 14 days. This step takes 10-15 minutes but prevents premature lifting and chipping issues. Start with clean, dry hands—no lotion or oils on the nail plate.
Step-by-Step Preparation
1. Shape your nails. Use a 180-grit file to create your desired shape. For chrome finishes, almond and round shapes showcase the mirror effect better than extreme stilettos because the powder application stays more even across gentler curves. File in one direction to prevent splitting.
2. Push back cuticles. Use a wooden or rubber cuticle pusher after softening cuticles with warm water for 2-3 minutes. Don't cut cuticles unless absolutely necessary—pushed-back cuticles heal faster and reduce infection risk.
3. Buff the nail surface. Use a 180-grit buffer to lightly rough up the nail plate. You're removing the natural oils and shine, not aggressively filing away nail thickness. 3-4 gentle passes in one direction is sufficient. Over-buffing thins the nail and causes long-term damage.
4. Remove all dust. Brush off filing dust completely. Any particles left behind create bumps under gel application that show through the chrome mirror finish.
5. Dehydrate and degrease. Saturate a lint-free wipe with rubbing alcohol and thoroughly wipe each nail. Let air-dry for 30 seconds. This step is critical—oils prevent gel adhesion at the molecular level. According to Byrdie's powder application guide, skipping dehydration is the leading cause of same-day chipping.
What Can Go Wrong: If nails feel slightly damp or tacky after alcohol application, you've used too much product or your alcohol concentration is too low. The surface should feel completely dry and slightly squeaky to the touch. Excess moisture prevents proper gel cure.
Expected Result: Nails should look matte, feel dry, and have no visible oils or dust. The surface should appear slightly rough under direct light.
Apply the Gel Base and Color Layers
Chrome powder is semi-transparent, meaning the color underneath affects the final appearance. Black gel creates the most dramatic mirror finish. Deep jewel tones create color-shifted chrome effects. White or nude bases produce a softer, pearl-like finish.
Application Sequence
1. Apply gel base coat. Use thin, even strokes from cuticle to free edge. Cap the free edge by running the brush along the nail tip—this seals the edge and prevents water infiltration. Avoid skin contact; gel on skin causes lifting within 24 hours.
Cure time: 30-60 seconds under LED lamp (48W), or 2 minutes under UV lamp. Follow your lamp's manufacturer guidance.
2. Apply first gel color coat. For chrome application, use black gel polish. Apply a thin layer—thick application causes wrinkling during cure and extends dry time. If you can see visible brush strokes, the layer is thin enough. Cover the entire nail plate but avoid flooding the cuticle area.
Cure time: 30-60 seconds LED, 2 minutes UV.
3. Apply second gel color coat. This layer should be slightly thicker and achieve full opacity. You shouldn't see your natural nail through the black. Cap the free edge again.
Cure time: 30-60 seconds LED, 2 minutes UV.
What Can Go Wrong: If gel polish bubbles during curing, you've applied too thick a layer or didn't cap the bottle properly (allowing air into the formula). Bubbles telegraph through chrome powder and ruin the mirror finish. If this happens, remove the gel layer with acetone and start over—there's no fix once cured.
Expected Result: Completely opaque, smooth black gel surface with no bubbles, dents, or texture. The surface should have a glossy shine.
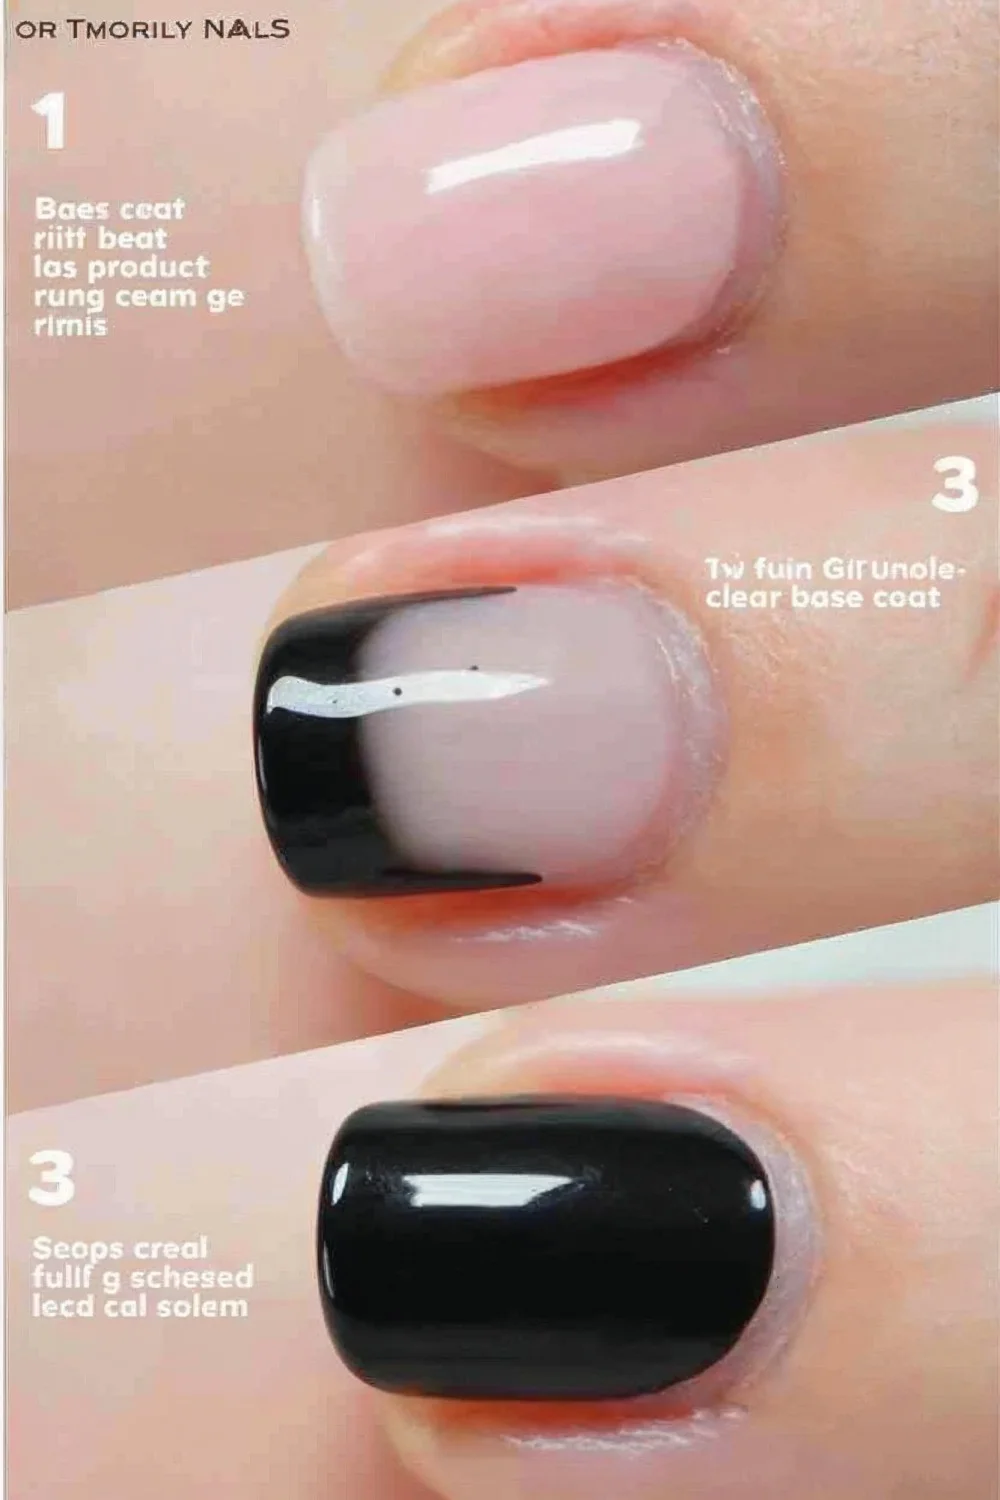
Apply the No-Wipe Top Coat
This is the critical layer for chrome adhesion. Regular gel top coats cure to a clean, non-tacky finish. No-wipe top coats leave an intentional sticky layer (called the inhibition layer) when cured. Chrome powder bonds to this tacky surface.
1. Apply no-wipe gel top coat. Use slightly thicker application than your base coat, ensuring complete coverage from cuticle to free edge. Don't cap the edge yet—you'll do that with the final sealing coat. The goal is a smooth, even layer without pooling at the cuticles or sides.
2. Cure fully. 60 seconds under LED, 2 minutes under UV. Don't under-cure this layer—partially cured gel creates an inconsistent tacky surface that leads to patchy chrome application.
3. Test tackiness. Lightly touch the nail surface with a clean fingertip. It should feel sticky but not wet. If it feels completely dry, you've used the wrong product (regular top coat instead of no-wipe). If it feels wet, it hasn't cured completely—add 30 seconds more cure time.
What Can Go Wrong: If the tacky layer has dust or lint on it, the chrome powder will lock those particles in and create visible spots. Work in a clean area and don't touch cured nails to fabric or hair before powder application.
Expected Result: Glossy black surface that feels tacky/sticky to the touch. The stickiness should be uniform across the entire nail.
Key Finding: Chrome powder requires the uncured inhibition layer of no-wipe gel top coats to create proper adhesion—regular top coats prevent powder bonding—OPI
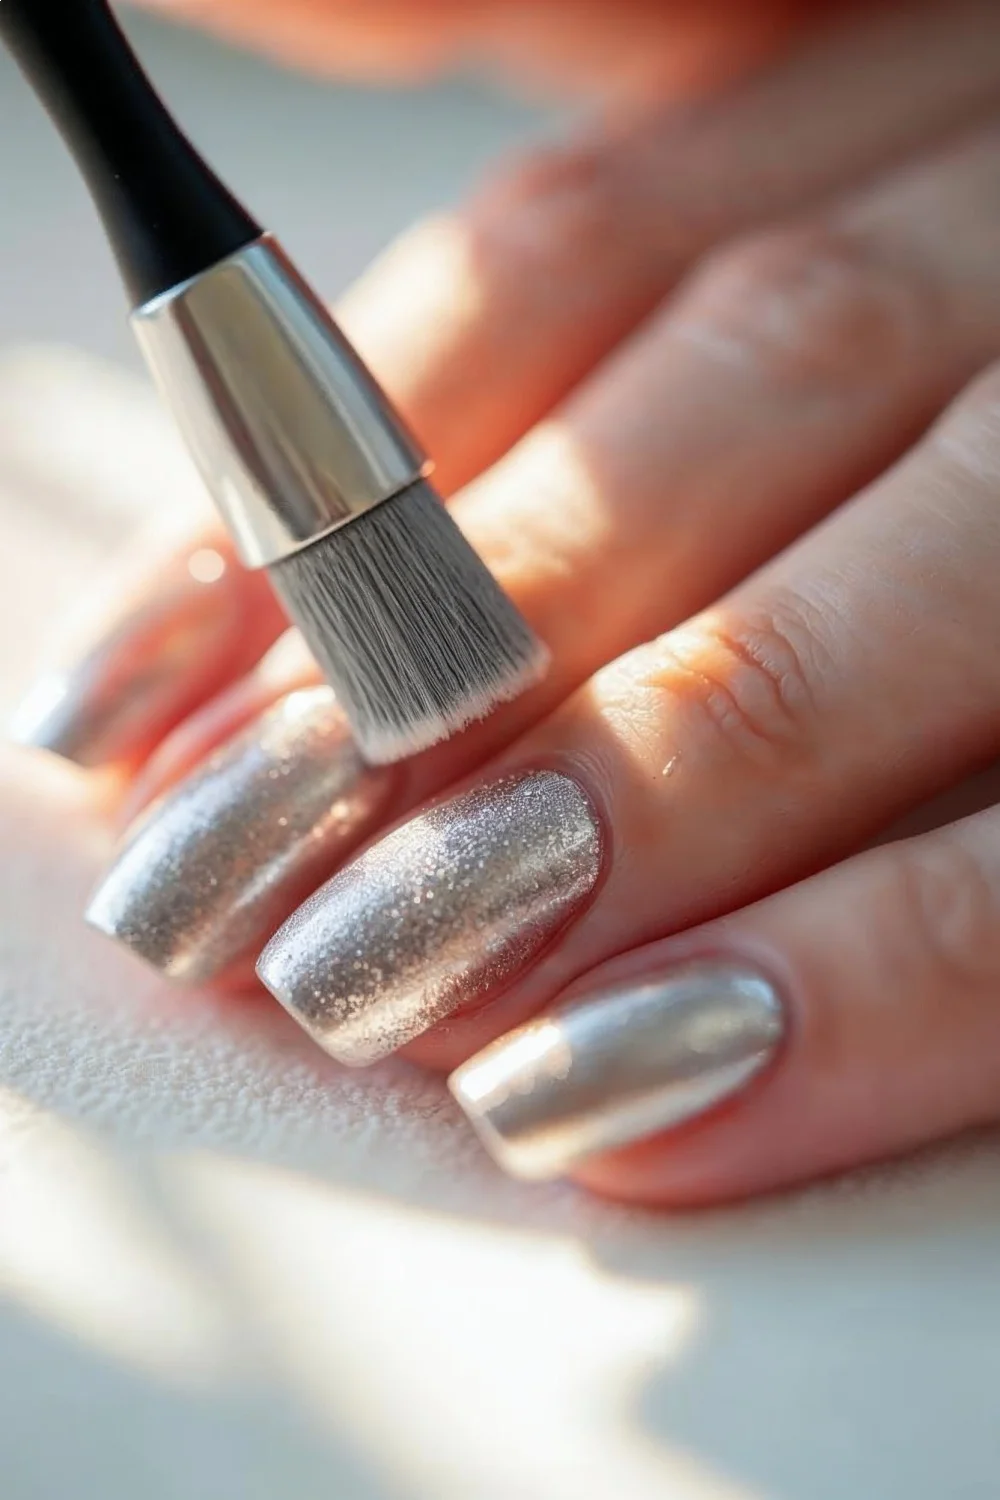
Apply Chrome Powder for Mirror Finish
This step happens quickly—5-10 seconds per nail. Chrome powder application is more forgiving than it looks. The key is even pressure and complete coverage.
1. Load your applicator. Dip an eyeshadow applicator or silicone-tipped tool into chrome powder. You need a generous amount—skimping on powder creates patchy results. Tap off excess powder back into the container.
2. Buff powder onto the nail. Using circular motions with moderate pressure, rub the powder onto the tacky surface. Start at the cuticle and work toward the free edge. The powder should transfer immediately and create shine as you buff. Continue buffing for 5-10 seconds until the entire nail shows mirror reflection.
3. Repeat for full coverage. If you see any dull spots or patches, load more powder and buff those areas specifically. The beauty of this technique is that you can keep adding and buffing until you're satisfied—the tacky layer stays workable for several minutes.
4. Remove excess powder. Use a clean, dry eyeshadow applicator or soft brush to dust off loose powder from the nail surface and surrounding skin. Be thorough—any loose powder will mix into your final top coat and dull the finish.
Technique Variation: Some applicators work better than others. Silicone-tipped tools create the most even application but cost more ($8-12). Standard eyeshadow applicators ($3-6 for a pack) work well but require slightly more buffing time. Avoid using fingers—skin oils transfer to the powder and create fingerprints in the finish.
What Can Go Wrong: Patchy coverage happens when the no-wipe top coat wasn't tacky enough or you're using too little powder. If you see streaks or dull areas, add more powder and buff longer. If the powder won't stick at all, your base layer wasn't a true no-wipe formula—you'll need to remove everything and start over with the correct product.
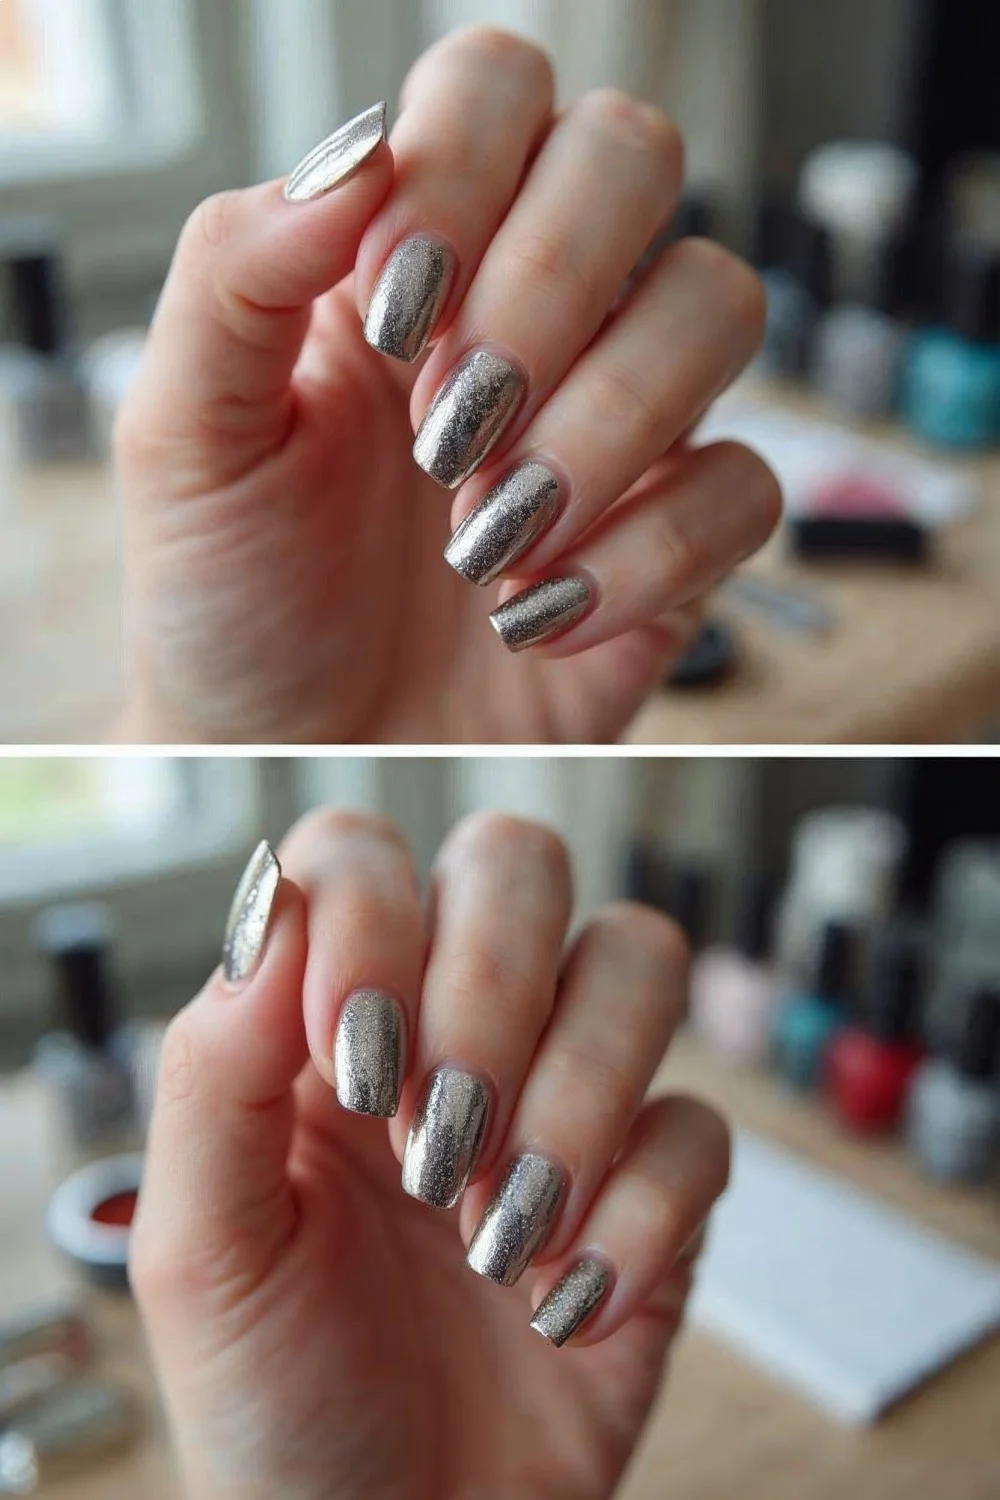
Expected Result: Complete mirror finish that reflects light like polished metal. You should see clear reflections of objects in the nail surface. The finish should be uniform with no dull patches.
Seal the Chrome Finish
Chrome powder is fragile without protection. This final sealing step locks in the mirror finish and provides chip resistance.
1. Apply regular gel top coat carefully. Switch to your standard glossy gel top coat (not the no-wipe formula). Use a light touch—pressing too hard can drag the chrome powder and create bald spots. Apply thin, even coverage from cuticle to free edge. This time, cap the free edge thoroughly.
Pro tip: Let the brush glide across the surface rather than pressing down. Think of it like floating the product over the chrome rather than painting it on.
2. Cure fully. 60 seconds LED, 2 minutes UV. Don't under-cure this layer—it's your wear protection.
3. Apply second top coat layer (optional but recommended). A second thin layer of glossy top coat adds durability and depth to the mirror finish. This extends wear time from 10 days to 14 days on average. Cure for another 60 seconds LED or 2 minutes UV.
4. Cleanse if needed. If your final top coat leaves a tacky residue (some do, some don't), wipe with rubbing alcohol on a lint-free pad. This is the only layer you cleanse—never wipe the chrome powder layer before sealing.
What Can Go Wrong: If you see the chrome finish dulling or streaking as you apply top coat, you're pressing too hard or using a formula that's too thick. Quickly wipe off the top coat with alcohol before it cures, reapply gently, and cure immediately. Some cheaper gel top coats are incompatible with chrome powder due to chemical interactions—professional brands like Gelish, OPI GelColor, and Beetles have better compatibility.
Expected Result: High-gloss mirror finish that's smooth to the touch with no tacky residue. The chrome should look "locked in" with no visible powder particles or dull areas.
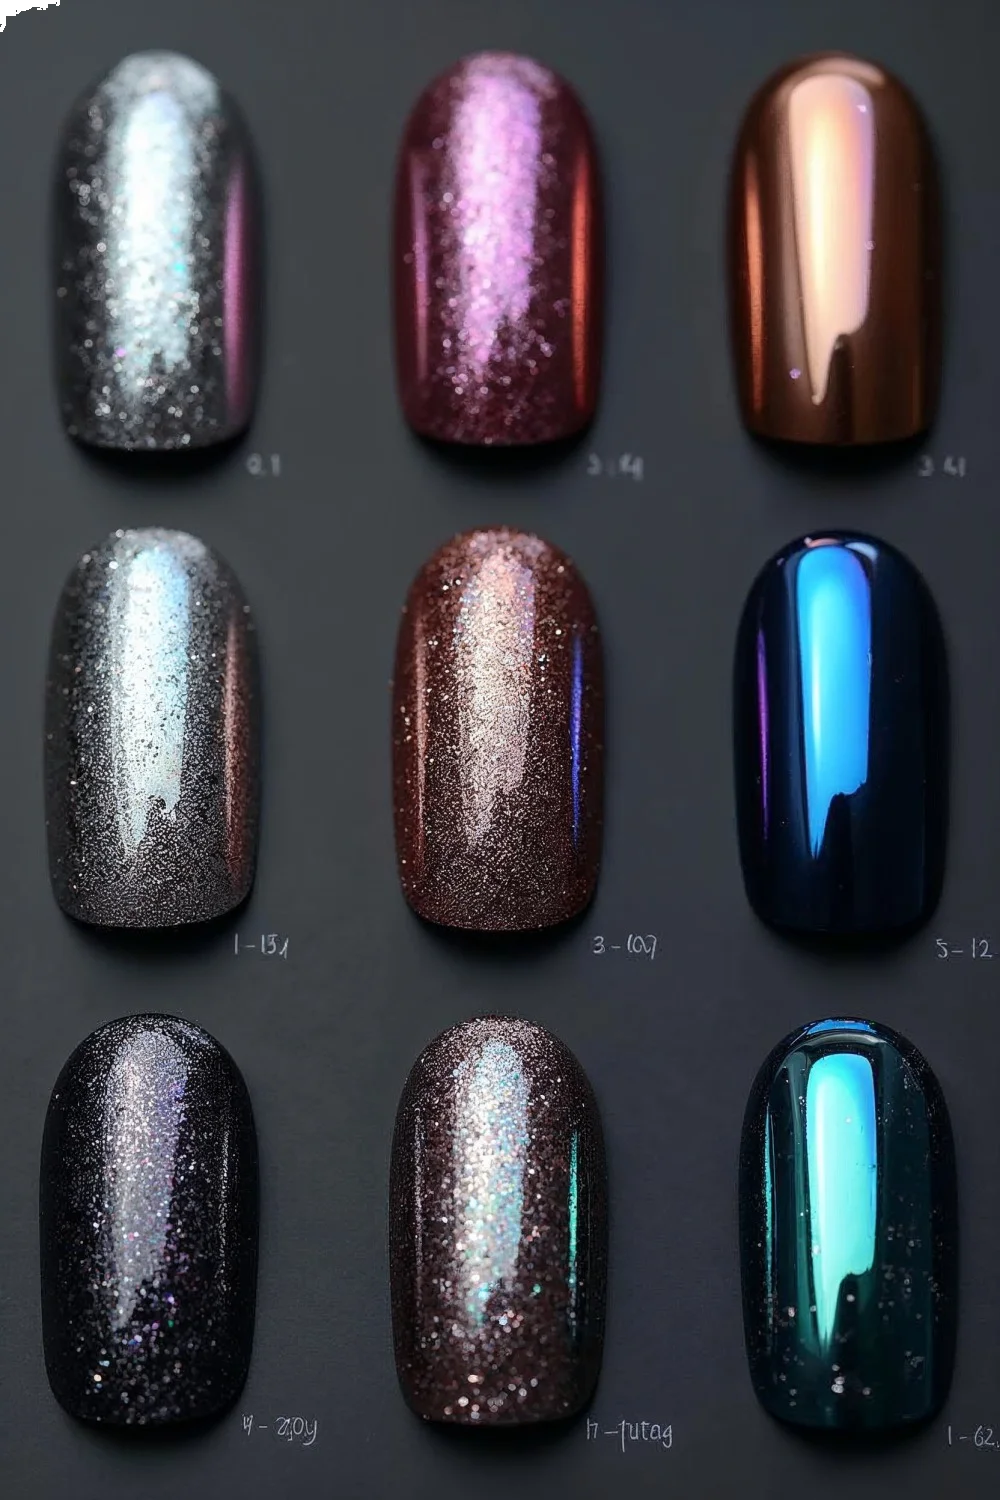
Chrome Variations and 2026 Trends
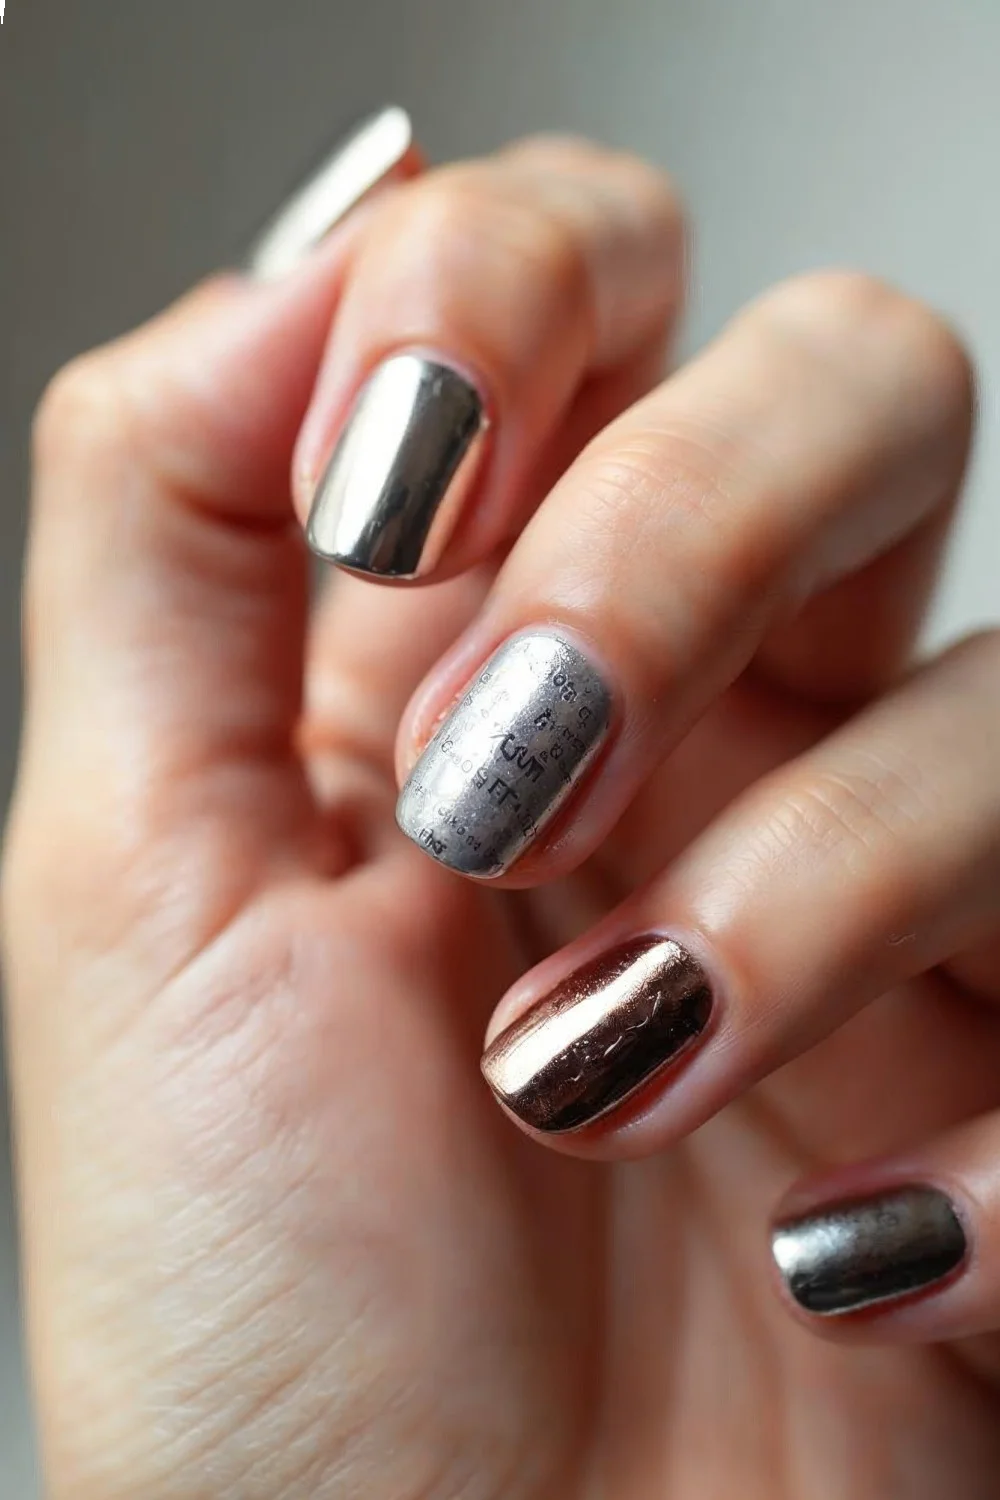
Classic silver chrome remains popular, but 2026 trends favor dimensional finishes that shift color or display holographic effects. These variations use the same application technique with different powder formulations.
Multi-Chrome Powders
These powders shift between 2-3 colors depending on viewing angle and lighting. Popular combinations include purple-blue-green, pink-gold-orange, and teal-purple-copper. Multi-chrome works best over black gel bases—the dark background makes color shifts more dramatic. Cost: $6-10 per jar.
Holographic Chrome
Holographic powders create rainbow light scatter similar to a CD surface. They deliver maximum impact over black bases and under direct sunlight. These powders require slightly more buffing time (8-12 seconds per nail) to achieve full holographic effect. Cost: $5-8 per jar.
Color-Shift Chrome
These powders maintain a mirror finish while shifting hue temperature—cool silver outdoors, warm gold indoors. They're more subtle than multi-chrome and pair well with short nail designs where dramatic effects can overwhelm the nail canvas. Cost: $7-12 per jar.
Aurora/Mermaid Chrome
This 2026 variation combines fine iridescent particles with chrome powder for a soft, ethereal finish. Application requires less buffing pressure and works over white or nude gel bases instead of black. The result is more pearl than mirror. Cost: $8-14 per jar.
Trend Forecast: According to Allure's chrome nail trend analysis, textured chrome combinations—pairing chrome on accent nails with matte finishes on others—dominated spring 2025 and continue into 2026. For summer nail colors 2026, aqua and coral chrome powders over coordinating gel bases are gaining traction.
Troubleshooting Common Chrome Nail Problems
Despite following steps precisely, certain issues arise based on product interactions, environmental factors, or technique variations. Here's how to diagnose and fix the most common problems.
Patchy or Streaky Chrome Coverage
Cause: Insufficient powder application, uneven tacky layer, or not enough buffing time.
Fix: Before sealing, add more chrome powder to affected areas and buff thoroughly. If the powder won't stick, your no-wipe top coat has dried out (after 10-15 minutes) or wasn't a true no-wipe formula. Remove with acetone and reapply the no-wipe layer before trying chrome again.
Chrome Powder Won't Stick At All
Cause: You used a regular gel top coat instead of no-wipe, or the gel didn't cure properly.
Fix: No workaround exists for this issue. Remove all layers with acetone, following safe gel removal procedures, and restart with confirmed no-wipe gel top coat. Check product labels carefully—some brands use terms like "non-cleansing" or "super shiny" instead of "no-wipe."
Chrome Finish Dulls After Top Coat
Cause: Pressing too hard during top coat application, incompatible gel formulas, or not enough excess powder removal before sealing.
Fix: Prevention works better than correction here. Use a high-quality gel top coat from the same brand family as your base and color. Apply with feather-light pressure. If dulling occurs, you can add a second thicker top coat layer, but the mirror finish won't fully recover.
Chipping Within 2-3 Days
Cause: Inadequate nail preparation (oils remaining), not capping the free edge, or weak base coat adhesion.
Fix: For current manicure, apply a thick layer of quick-dry regular polish top coat (like Seche Vite) over the chrome as a temporary seal—this adds 2-3 days of wear but isn't a permanent solution. For next application, focus on thorough alcohol degreasing and always cap free edges with every gel layer.
Air Bubbles Under Chrome
Cause: Bubbles in the gel color layer that weren't visible until chrome application magnified them.
Fix: No fix after chrome application. Remove and restart, applying thinner gel color coats. Thick gel application traps air during cure.
Chrome Looks Grainy Instead of Smooth
Cause: Cheap, coarse powder formulation or excess loose powder not removed before sealing.
Fix: Use a fluffy makeup brush to remove ALL loose powder before top coat application. If graininess persists, your powder quality is too low—invest in finer-milled chrome powder ($8-12 range instead of $3-4 bargain options).
| Problem | Most Likely Cause | Prevention Strategy |
|---|---|---|
| Patchy coverage | Insufficient powder | Use generous powder amount, buff longer |
| Won't stick | Wrong top coat type | Verify no-wipe formula before starting |
| Dulls after sealing | Top coat incompatibility | Use same-brand gel system throughout |
| Chips quickly | Poor prep or no edge capping | Thorough alcohol degreasing, cap every layer |
| Bubbles | Thick gel application | Apply thin gel coats, cure fully between |
| Grainy finish | Low-quality powder | Invest in finer-milled chrome powder |
Cost Analysis and Expected Wear Time
Understanding the true cost per manicure helps evaluate whether DIY chrome nails offer value compared to salon services.
Initial Investment: $30-45 for starter supplies
Cost Per Manicure: $1.20-2.00 (excluding lamp, which is one-time purchase)
- Base coat: $0.30-0.40 per application
- Color gel: $0.25-0.35 per application
- No-wipe top coat: $0.35-0.45 per application
- Chrome powder: $0.15-0.25 per application
- Final top coat: $0.30-0.40 per application
Salon Comparison: Professional chrome gel manicures cost $45-75 depending on location. After 5 DIY applications, you've broken even on supply costs.
Expected Wear Time: 10-14 days for dominant hand, 12-16 days for non-dominant hand. Wear time depends heavily on lifestyle factors—frequent hand-washing, typing, and contact with harsh chemicals reduce longevity. For vacation nails or special events, apply chrome 1-2 days before departure for peak appearance during your trip.
Supply Longevity: A single 2g jar of chrome powder provides 25-30 full manicures. Gel polish bottles (15ml standard) yield 30-40 applications. Your LED lamp lasts 50,000+ hours—essentially unlimited for home use.
Advanced Techniques and Design Combinations
Once you've mastered basic chrome application, these variations add artistic dimension.
Ombré Chrome
Apply chrome powder only to nail tips, blending into non-chromed gel at the cuticle area. This requires feathering the powder application—light pressure at blend zones, heavier at tips. Works beautifully over gradient gel bases. See techniques in our DIY gradient nails tutorial.
Chrome French Tips
For a modern take on French manicure, apply chrome powder only to the free edge over white or nude gel. The contrast between matte/glossy base and mirror tips creates striking dimension. This works particularly well for wedding nails when brides want subtle shine without full chrome intensity.
Accent Nail Chrome
Apply full chrome to 1-2 accent nails while keeping other nails in coordinating gel colors. This approach conserves chrome powder and creates visual interest without overwhelming the hand. Popular combinations include chrome ring fingers with matte or glossy gel on remaining nails.
Stamped Designs Over Chrome
Apply chrome base, seal with one thin top coat layer, then stamp designs using contrasting gel polish. Cure, then apply final top coat. This creates graphic designs that appear to float over the mirror finish. Note that this adds 15-20 minutes to total application time.
Chrome Over Nail Art
Reverse the typical order by creating detailed nail art first (florals, geometric designs, character art), curing, then applying chrome powder over specific design elements. When sealed, certain painted areas shimmer while others remain matte. This advanced technique requires precise powder application.
Maintaining Your Chrome Manicure
Proper maintenance extends wear time and preserves the mirror finish intensity.
Daily Care:
- Wear gloves for dishes, cleaning, and gardening—water exposure is the primary cause of premature lifting
- Apply cuticle oil daily around (not on) the sealed chrome to maintain nail flexibility
- Avoid using nails as tools—prying, scraping, and picking stress the free edge seal
Refresh Options: If minor tip wear occurs around day 8-10 but the chrome still looks good, apply a thin layer of regular quick-dry top coat (non-gel) over the entire nail. This adds 2-3 days of wear and restores glossiness. Seche Vite Dry Fast Top Coat works well for this purpose and costs $5-8 per bottle.
Removal: Chrome doesn't affect gel removal procedures. Follow standard acetone soak methods as detailed in our gel nail removal guide. The chrome powder dissolves along with the gel layers. Never peel or pick chrome nails—this damages the natural nail plate and can cause months of repair time.
Between-Manicure Recovery: If doing chrome nails frequently (every 2-3 weeks), allow nails one week of rest every 8-10 weeks. During rest weeks, focus on nail strengthening treatments and cuticle conditioning. This prevents cumulative damage from repeated buffing and gel application.
Product Recommendations by Budget
Brand selection matters less than product type (no-wipe vs. regular top coat), but certain formulations perform more consistently.
Budget-Friendly Complete Kit ($30-35)
- Beetles Gel Polish Kit: Includes base coat, black gel, no-wipe top coat, regular top coat, and mini LED lamp. Available on Amazon for $28-32.
- Born Pretty Chrome Powder: Reliable mirror finish in silver, rose gold, or holographic. $4-6 per jar.
- Generic eyeshadow applicators from craft stores: $3-4 for 20-pack.
Mid-Range Performance ($45-55)
- Gelish Foundation Base Coat: Professional-grade adhesion, $12-14
- OPI GelColor in Black Onyx: Excellent opacity, $10-12
- Makartt No-Wipe Top Coat: Consistent tacky layer, $11-13
- Daily Charme Chrome Powder: Finer particle size for smoother finish, $8-10
- Beetles 48W LED Lamp: Fast cure times, $22-25
Professional-Grade Home Setup ($70-85)
- CND Shellac Base Coat: Industry standard for adhesion, $13-15
- Gelish Black Shadow: Dense pigmentation, $12-14
- Gelish Top It Off No-Wipe: Formulated specifically for powder application, $14-16
- Glitterbels Chrome Powder: Professional salon quality, $12-15
- MelodySusie 54W LED Lamp: Oversized for both hands, $28-32
Brand Compatibility Note: Mixing brands within the gel system usually works fine, but staying within one brand family (OPI with OPI, Gelish with Gelish) reduces the risk of chemical incompatibility that causes dulling or poor adhesion.
Health and Safety Considerations
Gel polish and chrome powder are generally safe for home use when applied correctly, but certain precautions protect long-term nail health.
UV/LED Exposure: Modern LED lamps emit minimal UV radiation—less than 2 minutes of sun exposure per hand. However, those with photosensitivity conditions should apply SPF 30+ hand cream before curing or wear UV-protective gloves with fingertips cut out.
Ventilation: Chrome powder is fine particulate. Apply in a well-ventilated area to avoid inhaling particles. Don't blow excess powder off nails—this aerosolizes particles. Instead, brush away with a tool.
Acetone Safety: Always use pure acetone in a ventilated area. Prolonged skin contact causes dryness. Apply petroleum jelly or thick lotion to surrounding skin before removal to create a protective barrier.
Allergic Reactions: Gel polish allergies are rare but possible, typically manifesting as redness, itching, or swelling around the nail bed. If irritation occurs, remove the manicure immediately and consult a dermatologist. Don't apply gel polish to broken or infected skin.
Nail Damage Prevention: Over-buffing during prep thins the nail plate permanently. Light pressure for 3-4 passes is sufficient. If you notice your natural nails becoming papery or translucent, stop gel applications for 8-12 weeks and focus on strengthening treatments. Review healthy nail care practices for recovery protocols.
Integration with Seasonal and Event Styling
Chrome nails adapt well to different aesthetic contexts with simple color base adjustments.
For summer nail prep and beach nails, apply chrome over aqua, turquoise, or coral gel bases instead of black. This creates a softer, tropical shimmer rather than stark mirror finish. Holographic chrome over white gel mimics crushed seashells.
For patriotic holidays like Fourth of July or Memorial Day, use chrome on accent nails combined with red and blue gel polish on others. Alternatively, apply chrome over navy gel for deep metallic blue.
For spring nail art, aurora chrome over pastel bases (mint, lavender, pale pink) creates dimensional pearl effects that suit the season's softer aesthetic better than high-contrast silver chrome.
For formal events and wedding nails, rose gold or champagne chrome over nude gel provides subtle elegance. The mirror finish photographs beautifully and complements most dress colors.
Nail Length Considerations: Chrome works on any length but appears most balanced on short-to-medium nails. On very long nails, consider chrome accent nails or ombré application rather than full chrome on all fingers—the large reflective surface can appear overwhelming in person, though it photographs well.
Next Steps: Advancing Your Chrome Technique
Now that you've mastered basic chrome application, consider these progressions:
Experiment with base colors. Beyond black, try chrome over burgundy (creates copper tones), navy (creates gunmetal), or purple (creates color-shift effects). Document which combinations you prefer.
Invest in quality powders. Once comfortable with technique, upgrade to professional-grade chrome powders ($10-15 range) with finer particle sizes. The mirror finish intensifies noticeably.
Combine with other techniques. Review our nail art tutorials for ideas on integrating chrome with stamping, water marble, or hand-painted designs.
Address nail health. If you notice any thinning or weakness after multiple chrome applications, consult our best nail strengthener guide and take a break from gel applications.